> ## Documentation Index
> Fetch the complete documentation index at: https://docs.blaxel.ai/llms.txt
> Use this file to discover all available pages before exploring further.
# Build reusable sandbox images with Dockerfiles
> Create reusable sandbox images with pre-configured tools, languages, and frameworks using Dockerfiles. Deploy new sandboxes from images in seconds.
Sandbox images allow you to create customized & reusable sandbox environments. They define the tools, languages, frameworks, and configurations that will be available when you spawn a new sandbox instance.
Images are particularly useful for teams who need standardized environments or for creating many specialized sandboxes for repeated use cases (codegen agent, Git PR reviews agent, etc.).
## What are sandbox images?
Sandbox images are pre-configured container images that serve as blueprints for creating sandboxes. Each image includes:
* **Base environment**: Operating system and runtime configurations
* **Tools**: Languages, frameworks, and development tools
* **Configuration**: Environment variables, startup scripts, …
* **Resources**: Memory allocated
When you create a sandbox from an image, Blaxel provisions a new instance with all the specifications defined in that image.
### How sandbox images work
1. **Initial setup**: Follow this guide to create your sandbox image for the first time. Use `bl push` to publish the image to Blaxel's registry without creating a new sandbox or affecting existing sandboxes, or `bl deploy` to push the image and also create a sandbox from it.
2. **Build phase**: Your Dockerfile is used to create a container with all required tools and configurations.
3. **Initialization phase**: The sandbox API is injected and startup commands are executed.
4. **Instantiation**: New sandboxes can be spawned from this image in seconds.
You cannot directly use "library" container images (such as those hosted on Docker Hub and other registries) as sandbox images. Instead, you must create one or more custom images for your sandboxes using Dockerfiles and ensure that each image includes Blaxel's sandbox API binary. This is necessary for sandbox functionality like process management and file operations.
## Pre-built images
Blaxel provides a library of pre-built container images for common needs.
| Image | Description |
| ------------------------------------------------------------------------------------------------------------- | -------------------------------------------------------------------- |
| [`blaxel/base-image:latest`](https://github.com/blaxel-ai/sandbox/tree/main/hub/base-image) | Minimal environment with Node.js 22 (Alpine) and Python 3.12 |
| [`blaxel/py-app:latest`](https://github.com/blaxel-ai/sandbox/tree/main/hub/py-app) | Python 3.12 development environment |
| [`blaxel/ts-app:latest`](https://github.com/blaxel-ai/sandbox/tree/main/hub/ts-app) | TypeScript development environment with Node.js 22 (slim) |
| [`blaxel/node:latest`](https://github.com/blaxel-ai/sandbox/tree/main/hub/node) | Node.js development environment with Node.js 23 (Alpine) |
| [`blaxel/claude-code:latest`](https://github.com/blaxel-ai/sandbox/tree/main/hub/claude-code) | Claude Code CLI environment with Node.js 24 (slim) |
| [`blaxel/codex:latest`](https://github.com/blaxel-ai/sandbox/tree/main/hub/codex) | Codex CLI environment with Node.js 24 (slim) |
| [`blaxel/nextjs:latest`](https://github.com/blaxel-ai/sandbox/tree/main/hub/nextjs) | Next.js development environment with Node.js 22 (Alpine) |
| [`blaxel/vite:latest`](https://github.com/blaxel-ai/sandbox/tree/main/hub/vite) | Vite + React + TS development environment with Node.js 22 (Alpine) |
| [`blaxel/astro:latest`](https://github.com/blaxel-ai/sandbox/tree/main/hub/astro) | Astro development environment with Node.js 22 (Alpine) |
| [`blaxel/expo:latest`](https://github.com/blaxel-ai/sandbox/tree/main/hub/expo) | React Native (Expo) development with Node.js 22 (Alpine) |
| [`blaxel/chromium:latest`](https://github.com/blaxel-ai/sandbox/tree/main/hub/chromium) | Headless Chromium environment with Chrome 124 (Alpine) |
| [`blaxel/lightpanda:latest`](https://github.com/blaxel-ai/sandbox/tree/main/hub/lightpanda) | Lightweight headless browser |
| [`blaxel/playwright-chromium:latest`](https://github.com/blaxel-ai/sandbox/tree/main/hub/playwright-chromium) | Playwright + Chromium browser automation environment with Node.js 20 |
| [`blaxel/playwright-firefox:latest`](https://github.com/blaxel-ai/sandbox/tree/main/hub/playwright-firefox) | Playwright + Firefox browser automation environment with Node.js 20 |
| [`blaxel/docker-in-sandbox:latest`](https://github.com/blaxel-ai/sandbox/tree/main/hub/docker-in-sandbox) | Docker environment |
| [`blaxel/xfce-vnc:latest`](https://github.com/blaxel-ai/sandbox/tree/main/hub/xfce-vnc) | XFCE desktop environment with VNC |
| [`blaxel/cua-xfce:latest`](https://github.com/blaxel-ai/sandbox/tree/main/hub/cua-xfce) | XFCE desktop environment with CUA |
| [`blaxel/jupyter-notebook:latest`](https://github.com/blaxel-ai/sandbox/tree/main/hub/jupyter-notebook) | Jupyter Notebook with Python 3.12 |
| [`blaxel/jupyter-server:latest`](https://github.com/blaxel-ai/sandbox/tree/main/hub/jupyter-server) | Jupyter Server with Python 3.12 |
| [`blaxel/benchmark:latest`](https://github.com/blaxel-ai/sandbox/tree/main/hub/benchmark) | Sandbox benchmarking environment |
## Custom images
You can also customize an image for specific needs.
### Create a sandbox image
You can create a customized sandbox image using the Blaxel CLI or REST API.
#### Blaxel CLI
##### 1. Initialize an image
Start by creating a new sandbox image using the Blaxel CLI:
```bash theme={null}
bl new sandbox mytemplate
```
This creates a new directory with the essential image files:
```text theme={null}
mytemplate/
├── blaxel.toml # Image configuration
├── Makefile # Build commands
├── Dockerfile # Defines the sandbox environment
└── entrypoint.sh # Initialization script
```
##### 2. Customize the Dockerfile
The Dockerfile is the heart of your image. It defines what will be available in your sandbox environment.
```docker theme={null}
# Choose a base image
FROM node:22-alpine
# Set working directory
WORKDIR /app
# Copy sandbox API (required)
COPY --from=ghcr.io/blaxel-ai/sandbox:latest /sandbox-api /usr/local/bin/sandbox-api
# Install system dependencies
RUN apk update && apk add --no-cache \
git curl python3 make g++ netcat-openbsd \
&& rm -rf /var/cache/apk/*
# Copy and set up entrypoint
COPY entrypoint.sh /entrypoint.sh
RUN chmod +x /entrypoint.sh
ENTRYPOINT ["/entrypoint.sh"]
```
**Always include** the *sandbox-api* binary from the Blaxel base image. This is required for sandbox functionality like process management and file operations.
##### 3. Configure image settings
The `blaxel.toml` file defines your image’s runtime configuration:
```toml theme={null}
name = "mytemplate"
type = "sandbox"
description = "Full-stack development environment with Node.js and Python"
[runtime]
generation = "mk3"
memory = 8192 # 8GB RAM
# Define exposed ports
[[runtime.ports]]
name = "dev-server"
target = 3000
protocol = "tcp"
[[runtime.ports]]
name = "another-api"
target = 8888
protocol = "tcp"
# Set environment variables
[env]
NODE_ENV = "development"
PYTHON_ENV = "development"
```
It is not possible to add or update environment variables for a sandbox after it is created. Ensure that any required environment variables are defined in your Dockerfile, your `blaxel.toml` file, or at sandbox creation time using the Blaxel SDKs. See the [variables and secrets](/Sandboxes/Variables-and-secrets) documentation for details.
##### 4. Define initialization
The `entrypoint.sh` script runs when a sandbox is created from this image:
```bash theme={null}
#!/bin/sh
# Start the sandbox API (required)
/usr/local/bin/sandbox-api &
# Wait for sandbox API to be ready
echo "Waiting for sandbox API..."
while ! nc -z 127.0.0.1 8080; do
sleep 0.1
done
echo "Sandbox API ready"
# Initialize your environment
echo "Setting up development environment..."
# Example: Start a development server in the background
if [ -f /app/package.json ]; then
cd /app
npm install
# Execute curl command, we execute it through the sandbox-api so that you can access logs,
# process status and everything you can do with the sandbox api
echo "Running Next.js dev server..."
curl http://127.0.0.1:8080/process -X POST -d '{"workingDir": "/app", "command": "npm run dev", "waitForCompletion": false}' -H "Content-Type: application/json"
fi
# Keep the container running
wait
```
##### 5. Build and test locally
Before pushing the image to Blaxel, test it locally:
```bash theme={null}
# Build the Docker image
make build
# Run locally to test
make run
# Access your sandbox-api on exposed ports
# e.g., http://127.0.0.1:8080
# Example: curl http://127.0.0.1:8080/process
```
##### 6. Push the image
Once satisfied with your configuration, push the image to Blaxel:
```bash theme={null}
bl push
```
This will:
1. Build your Docker image
2. Push it to Blaxel's registry (private to your workspace)
3. Return an image ID you can use for creating sandboxes
Use `bl deploy` instead if you also want Blaxel to automatically create a first sandbox from this image, so you can test it:
```bash theme={null}
bl deploy
```
You can monitor the sandbox deployment with:
```bash theme={null}
bl get sandbox mytemplate --watch
```
You can safely delete the sandbox afterwards, and keep using the image for new sandboxes.
#### Blaxel SDK
The Blaxel SDK includes a declarative image builder that lets you define custom sandbox images directly in your code using a fluent, chainable API. Instead of writing Dockerfiles manually, you describe your image step by step, and the SDK generates the Dockerfile, builds the image, and deploys it as a sandbox.
This approach is ideal for dynamic image definitions, CI/CD pipelines, or when your image configuration depends on runtime logic.
The declarative image builder is available in the **TypeScript** and **Python** SDKs. The Go SDK does not support this feature.
Here is a simple example of how to use it:
```typescript TypeScript theme={null}
import { ImageInstance } from "@blaxel/core";
const image = ImageInstance.fromRegistry("python:3.11-slim")
.aptInstall("git", "curl")
.workdir("/app")
.pipInstall("requests", "httpx", "pydantic")
.env({ PYTHONUNBUFFERED: "1" });
const sandbox = await image.build({
name: "my-sandbox",
memory: 4096,
});
```
```python Python theme={null}
from blaxel.core import ImageInstance
image = (
ImageInstance.from_registry("python:3.11-slim")
.apt_install("git", "curl")
.workdir("/app")
.pip_install("requests", "httpx", "pydantic")
.env(PYTHONUNBUFFERED="1")
)
sandbox = await image.build(
name="my-sandbox",
memory=4096,
)
```
The three steps to use the image builder are:
1. **Define**: Use the fluent API to describe your image starting from a base image.
2. **Chain**: Each method returns a new immutable `ImageInstance`, so you can branch and reuse configurations.
3. **Build**: Call `build()` to generate a Dockerfile, package it with any local files, upload it to Blaxel, and deploy it as a sandbox.
The SDK automatically injects the Blaxel sandbox API binary and sets a default entrypoint (if you haven't specified one), so your image is ready to use as a sandbox without manual configuration.
##### Select a base image
Start by selecting a base image from any Docker registry:
```typescript TypeScript theme={null}
import { ImageInstance } from "@blaxel/core";
const image = ImageInstance.fromRegistry("ubuntu:22.04");
```
```python Python theme={null}
from blaxel.core import ImageInstance
image = ImageInstance.from_registry("ubuntu:22.04")
```
##### Execute build commands
Execute shell commands during the image build:
```typescript TypeScript theme={null}
const image = ImageInstance.fromRegistry("node:20")
.runCommands(
"apt-get update && apt-get install -y python3 make g++"
);
```
```python Python theme={null}
image = (
ImageInstance.from_registry("node:20")
.run_commands(
"apt-get update && apt-get install -y python3 make g++",
)
)
```
##### Use package managers
The SDK provides convenience methods for common package managers. These generate optimized `RUN` commands with sensible defaults (e.g., cache cleanup for apt).
###### Python (pip)
```typescript TypeScript theme={null}
// Simple install
const image = ImageInstance.fromRegistry("python:3.11-slim")
.pipInstall("requests", "numpy>=1.20", "pandas");
// With options
const image = ImageInstance.fromRegistry("python:3.11-slim")
.pipInstall(
{ indexUrl: "https://my-private-index.com/simple", pre: true },
"my-package",
"another-package"
);
```
```python Python theme={null}
# Simple install
image = (
ImageInstance.from_registry("python:3.11-slim")
.pip_install("requests", "numpy>=1.20", "pandas")
)
# With options
image = (
ImageInstance.from_registry("python:3.11-slim")
.pip_install(
"my-package",
"another-package",
index_url="https://my-private-index.com/simple",
pre=True,
)
)
```
###### Python (uv)
```typescript TypeScript theme={null}
const image = ImageInstance.fromRegistry("python:3.11-slim")
.runCommands("pip install uv")
.uvInstall("requests", "httpx");
```
```python Python theme={null}
image = (
ImageInstance.from_registry("python:3.11-slim")
.run_commands("pip install uv")
.uv_install("requests", "httpx")
)
```
###### Node.js (npm, yarn, pnpm, bun)
```typescript TypeScript theme={null}
// Install specific packages with npm (default)
const image = ImageInstance.fromRegistry("node:20-alpine")
.npmInstall("express", "typescript");
// Use a different package manager
const image = ImageInstance.fromRegistry("node:20-alpine")
.npmInstall(
{ packageManager: "pnpm", globalInstall: true },
"turbo"
);
// Install from package.json (no packages specified)
const image = ImageInstance.fromRegistry("node:20-alpine")
.workdir("/app")
.copy("package.json", "/app/package.json")
.npmInstall();
```
```python Python theme={null}
# Install specific packages with npm (default)
image = (
ImageInstance.from_registry("node:20-alpine")
.npm_install("express", "typescript")
)
# Use a different package manager
image = (
ImageInstance.from_registry("node:20-alpine")
.npm_install("turbo", package_manager="pnpm", global_install=True)
)
# Install from package.json (no packages specified)
image = (
ImageInstance.from_registry("node:20-alpine")
.workdir("/app")
.copy("package.json", "/app/package.json")
.npm_install()
)
```
###### Install system packages (apt, apk)
```typescript TypeScript theme={null}
// Debian/Ubuntu (apt-get)
const image = ImageInstance.fromRegistry("ubuntu:22.04")
.aptInstall("git", "curl", "build-essential");
// Alpine (apk)
const image = ImageInstance.fromRegistry("node:20-alpine")
.apkAdd("git", "curl", "python3");
```
```python Python theme={null}
# Debian/Ubuntu (apt-get)
image = (
ImageInstance.from_registry("ubuntu:22.04")
.apt_install("git", "curl", "build-essential")
)
# Alpine (apk)
image = (
ImageInstance.from_registry("node:20-alpine")
.apk_add("git", "curl", "python3")
)
```
###### Use other package managers
```typescript TypeScript theme={null}
// Ruby gems
const image = ImageInstance.fromRegistry("ruby:3.2")
.gemInstall("rails", "bundler");
// Rust crates
const image = ImageInstance.fromRegistry("rust:1.75")
.cargoInstall({ locked: true }, "cargo-watch", "cargo-edit");
// Go packages
const image = ImageInstance.fromRegistry("golang:1.22")
.goInstall("github.com/golangci/golangci-lint/cmd/golangci-lint@latest");
// PHP Composer
const image = ImageInstance.fromRegistry("php:8.3-cli")
.composerInstall("laravel/framework", "guzzlehttp/guzzle");
// Python CLI tools (pipx)
const image = ImageInstance.fromRegistry("python:3.11")
.pipxInstall("black", "ruff");
```
```python Python theme={null}
# Ruby gems
image = (
ImageInstance.from_registry("ruby:3.2")
.gem_install("rails", "bundler")
)
# Rust crates
image = (
ImageInstance.from_registry("rust:1.75")
.cargo_install("cargo-watch", "cargo-edit", locked=True)
)
# Go packages
image = (
ImageInstance.from_registry("golang:1.22")
.go_install("github.com/golangci/golangci-lint/cmd/golangci-lint@latest")
)
# PHP Composer
image = (
ImageInstance.from_registry("php:8.3-cli")
.composer_install("laravel/framework", "guzzlehttp/guzzle")
)
# Python CLI tools (pipx)
image = (
ImageInstance.from_registry("python:3.11")
.pipx_install("black", "ruff")
)
```
##### Add Dockerfile instructions
All standard Dockerfile instructions are available as methods.
###### Specify the working directory
```typescript TypeScript theme={null}
const image = ImageInstance.fromRegistry("node:20")
.workdir("/app");
```
```python Python theme={null}
image = ImageInstance.from_registry("node:20").workdir("/app")
```
###### Define environment variables
```typescript TypeScript theme={null}
const image = ImageInstance.fromRegistry("python:3.11")
.env({
PYTHONUNBUFFERED: "1",
APP_ENV: "production",
});
```
```python Python theme={null}
image = (
ImageInstance.from_registry("python:3.11")
.env(PYTHONUNBUFFERED="1", APP_ENV="production")
)
```
###### Copy files
```typescript TypeScript theme={null}
const image = ImageInstance.fromRegistry("node:20")
.workdir("/app")
.copy("package.json", "/app/package.json")
.copy("src", "/app/src");
```
```python Python theme={null}
image = (
ImageInstance.from_registry("node:20")
.workdir("/app")
.copy("package.json", "/app/package.json")
.copy("src", "/app/src")
)
```
###### Expose ports
```typescript TypeScript theme={null}
const image = ImageInstance.fromRegistry("node:20")
.expose(3000, 8080);
```
```python Python theme={null}
image = ImageInstance.from_registry("node:20").expose(3000, 8080)
```
###### Set an entrypoint
```typescript TypeScript theme={null}
const image = ImageInstance.fromRegistry("python:3.11")
.entrypoint("python", "-m", "uvicorn", "main:app");
```
```python Python theme={null}
image = (
ImageInstance.from_registry("python:3.11")
.entrypoint("python", "-m", "uvicorn", "main:app")
)
```
###### Add users
```typescript TypeScript theme={null}
const image = ImageInstance.fromRegistry("ubuntu:22.04")
.runCommands("useradd -m appuser")
.user("appuser");
```
```python Python theme={null}
image = (
ImageInstance.from_registry("ubuntu:22.04")
.run_commands("useradd -m appuser")
.user("appuser")
)
```
###### Add labels and build arguments
```typescript TypeScript theme={null}
const image = ImageInstance.fromRegistry("python:3.11")
.label({ version: "1.0", maintainer: "team@example.com" })
.arg("BUILD_ENV", "production");
```
```python Python theme={null}
image = (
ImageInstance.from_registry("python:3.11")
.label(version="1.0", maintainer="team@example.com")
.arg("BUILD_ENV", "production")
)
```
##### Add local files
Copy files and directories from your local machine into the image:
```typescript TypeScript theme={null}
const image = ImageInstance.fromRegistry("python:3.11")
.workdir("/app")
.addLocalFile("./config.json", "/app/config.json")
.addLocalDir("./src", "/app/src");
```
```python Python theme={null}
image = (
ImageInstance.from_registry("python:3.11")
.workdir("/app")
.add_local_file("./config.json", "/app/config.json")
.add_local_dir("./src", "/app/src")
)
```
Local files are resolved to absolute paths, included in the build context, and `COPY`-ed into the image. You can optionally provide a `contextName` (TypeScript) / `context_name` (Python) parameter to control the filename in the build context.
##### Build and deploy
###### Basic build
```typescript TypeScript theme={null}
const sandbox = await image.build({
name: "my-sandbox",
});
```
```python Python theme={null}
sandbox = await image.build(name="my-sandbox")
```
###### Build with all options
```typescript TypeScript theme={null}
const sandbox = await image.build({
name: "my-sandbox",
memory: 8192, // Memory in MB (default: 4096)
timeout: 900000, // Timeout in ms (default: 900000 = 15 min) — NOTE: Python SDK uses seconds
sandboxVersion: "latest", // Sandbox API version
onStatusChange: (status) => {
console.log(`Build status: ${status}`);
},
});
```
```python Python theme={null}
sandbox = await image.build(
name="my-sandbox",
memory=8192, # Memory in MB (default: 4096)
timeout=900.0, # Timeout in seconds (default: 900) — NOTE: TypeScript SDK uses ms
sandbox_version="latest", # Sandbox API version
on_status_change=lambda s: print(f"Build status: {s}"),
)
```
The `build()` method automatically:
* Injects the Blaxel sandbox API binary
* Sets a default entrypoint if none was specified
* Packages the Dockerfile and local files into a ZIP archive
* Uploads and deploys the image as a sandbox
* Polls until the sandbox reaches `DEPLOYED` or `FAILED` status
###### Inspect the generated Dockerfile
You can preview the Dockerfile without building:
```typescript TypeScript theme={null}
const image = ImageInstance.fromRegistry("python:3.11-slim")
.aptInstall("git")
.workdir("/app")
.pipInstall("requests");
console.log(image.dockerfile);
// FROM python:3.11-slim
// RUN apt-get update && apt-get install -y --no-install-recommends git && rm -rf /var/lib/apt/lists/*
// WORKDIR /app
// RUN pip install requests
```
```python Python theme={null}
image = (
ImageInstance.from_registry("python:3.11-slim")
.apt_install("git")
.workdir("/app")
.pip_install("requests")
)
print(image.dockerfile)
# FROM python:3.11-slim
# RUN apt-get update && apt-get install -y --no-install-recommends git && rm -rf /var/lib/apt/lists/*
# WORKDIR /app
# RUN pip install requests
```
###### Write to disk
You can also write the image to a folder for manual inspection or use with `bl deploy`:
```typescript TypeScript theme={null}
// Write to a specific directory
const buildDir = image.write("./output", "my-image");
// Write to a temporary directory
const tempDir = image.writeTemp();
```
```python Python theme={null}
# Write to a specific directory
build_dir = image.write("./output", "my-image")
# Write to a temporary directory
temp_dir = image.write_temp()
```
##### Understand immutability and branching
Each method returns a new `ImageInstance`, leaving the original unchanged. This lets you create base images and branch from them:
```typescript TypeScript theme={null}
// Define a shared base
const base = ImageInstance.fromRegistry("python:3.11-slim")
.aptInstall("git", "curl")
.workdir("/app");
// Branch for different use cases
const mlImage = base
.pipInstall("torch", "transformers", "datasets")
.env({ CUDA_VISIBLE_DEVICES: "0" });
const webImage = base
.pipInstall("fastapi", "uvicorn", "sqlalchemy")
.expose(8000)
.entrypoint("python", "-m", "uvicorn", "main:app", "--host", "::");
// Build both independently
const mlSandbox = await mlImage.build({ name: "ml-sandbox", memory: 16384 });
const webSandbox = await webImage.build({ name: "web-sandbox", memory: 4096 });
```
```python Python theme={null}
# Define a shared base
base = (
ImageInstance.from_registry("python:3.11-slim")
.apt_install("git", "curl")
.workdir("/app")
)
# Branch for different use cases
ml_image = (
base
.pip_install("torch", "transformers", "datasets")
.env(CUDA_VISIBLE_DEVICES="0")
)
web_image = (
base
.pip_install("fastapi", "uvicorn", "sqlalchemy")
.expose(8000)
.entrypoint("python", "-m", "uvicorn", "main:app", "--host", "::")
)
# Build both independently
ml_sandbox = await ml_image.build(name="ml-sandbox", memory=16384)
web_sandbox = await web_image.build(name="web-sandbox", memory=4096)
```
##### Example script
A complete example building a Node.js / Python development sandbox:
```typescript TypeScript theme={null}
import { ImageInstance } from "@blaxel/core";
const sandbox = await ImageInstance.fromRegistry("node:20-bookworm-slim")
// System dependencies
.aptInstall("git", "curl", "build-essential")
// Working directory
.workdir("/app")
// Node.js dependencies
.npmInstall({ packageManager: "npm", globalInstall: true }, "turbo")
// Environment
.env({
NODE_ENV: "development",
EDITOR: "code",
})
// Expose dev server ports
.expose(3000, 5173)
// Build and deploy
.build({
name: "node-dev",
memory: 8192,
onStatusChange: (status) => console.log(`Status: ${status}`),
});
console.log("Sandbox deployed:", sandbox.metadata?.name);
```
```python Python theme={null}
import asyncio
from blaxel.core import ImageInstance
async def main():
sandbox = await (
ImageInstance.from_registry("python:3.12-slim")
# System dependencies
.apt_install("git", "curl", "build-essential")
# Working directory
.workdir("/app")
# Python dependencies
.pip_install("httpie", "ipython", "requests", "fastapi", "uvicorn")
# Environment
.env(
PYTHONUNBUFFERED="1",
EDITOR="code",
)
# Expose dev server port
.expose(8000)
# Build and deploy
.build(
name="python-dev",
memory=8192,
on_status_change=lambda s: print(f"Status: {s}"),
)
)
print("Sandbox deployed:", sandbox.metadata.name if sandbox.metadata else None)
asyncio.run(main())
```
##### API reference
###### Methods
| Method | Description |
| -------------------------------------- | ------------------------------------------------- |
| `fromRegistry` / `from_registry` | Create an image from a Docker registry base image |
| `runCommands` / `run_commands` | Run shell commands (`RUN`) |
| `workdir` | Set working directory (`WORKDIR`) |
| `env` | Set environment variables (`ENV`) |
| `copy` | Copy from build context (`COPY`) |
| `addLocalFile` / `add_local_file` | Add a local file to build context and image |
| `addLocalDir` / `add_local_dir` | Add a local directory to build context and image |
| `expose` | Expose ports (`EXPOSE`) |
| `entrypoint` | Set container entrypoint (`ENTRYPOINT`) |
| `user` | Set the user (`USER`) |
| `label` | Add labels (`LABEL`) |
| `arg` | Define build arguments (`ARG`) |
| `pipInstall` / `pip_install` | Install Python packages with pip |
| `uvInstall` / `uv_install` | Install Python packages with uv |
| `pipxInstall` / `pipx_install` | Install Python CLI apps with pipx |
| `aptInstall` / `apt_install` | Install Debian/Ubuntu packages |
| `apkAdd` / `apk_add` | Install Alpine packages |
| `npmInstall` / `npm_install` | Install Node.js packages (npm/yarn/pnpm/bun) |
| `gemInstall` / `gem_install` | Install Ruby gems |
| `cargoInstall` / `cargo_install` | Install Rust crates |
| `goInstall` / `go_install` | Install Go packages |
| `composerInstall` / `composer_install` | Install PHP packages |
| `build` | Build and deploy as a sandbox |
| `write` | Write image to a folder |
| `writeTemp` / `write_temp` | Write image to a temporary folder |
###### Properties
| Property | Description |
| -------------------------- | --------------------------------------------------- |
| `dockerfile` | Generated Dockerfile content |
| `hash` | 12-character SHA256 hash of the image configuration |
| `baseImage` / `base_image` | Base image tag |
#### Blaxel API
Although less common, it is also possible to create a sandbox image and sandbox by directly interacting with the Blaxel API.
Ensure that you have the following:
* A [Blaxel API key](https://app.blaxel.ai/profile/security)
* The workspace name, found at the bottom left corner of the [Blaxel Console](https://app.blaxel.ai/) or via `bl workspaces`
##### 1. Create a ZIP archive
Create a directory with the following project contents:
* `Dockerfile` (required) - Defines your custom sandbox image and must include `sandbox-api`
* Any custom scripts (e.g., `entrypoint.sh` for initialization logic)
* Configuration files or data files as needed
* Additional dependencies or binaries your sandbox requires
Here is an example of the expected project structure:
```text theme={null}
mytemplate/
├── Dockerfile # Required - defines your image
└── entrypoint.sh # Optional - for custom initialization
```
* The Dockerfile is the heart of your image. It defines what will be available in your sandbox environment. [See an example](#2-customize-the-dockerfile).
* The `entrypoint.sh` script runs when a sandbox is created from this image. [See an example](#4-define-initialization).
The Dockerfile can reference and use any files included in the ZIP archive. Everything gets extracted and built together as a Docker image.
Once the files are ready, create a ZIP archive containing the files:
```bash theme={null}
(cd mytemplate && zip -r ../mytemplate.zip .)
```
##### 2. Create a sandbox resource
Set your Blaxel API key and workspace as environment variables:
```bash theme={null}
export BL_API_KEY=YOUR_API_KEY
export BL_WORKSPACE=YOUR_WORKSPACE_NAME
```
Make an HTTP POST request to create or update your sandbox resource. This will return an upload URL for the ZIP archive.
```bash theme={null}
curl -v -X POST "https://api.blaxel.ai/v0/sandboxes?upload=true" \
-H "Authorization: Bearer $BL_API_KEY" \
-H "X-Blaxel-Workspace: $BL_WORKSPACE" \
-H "Content-Type: application/json" \
-d '{
"apiVersion": "blaxel.ai/v1alpha1",
"kind": "Sandbox",
"metadata": {
"name": "my-sandbox"
},
"spec": {
"runtime": {
"memory": 2048
},
"region": "us-pdx-1"
}
}'
```
Note the `upload=true` query parameter in the request, which indicates intent to upload custom code.
The Blaxel API returns a JSON response. The response contains an `x-blaxel-upload-url` response header, containing the target URL to use when uploading your image. The URL is in the response headers, not the JSON body.
Example response:
```http theme={null}
HTTP/2 200
x-blaxel-upload-url: https://controlplane-prod-build-sources...
```
Refer to the documentation on [sandbox configuration parameters](#understand-sandbox-configuration) for more information on the body of the POST request.
##### 3. Upload ZIP archive
Use an HTTP PUT request to upload the ZIP file to the upload URL. Replace the placeholder URL in the command below with the value of the `x-blaxel-upload-url` response header received earlier.
```bash theme={null}
export UPLOAD_URL="https://controlplane-prod-build-sources..."
curl -X PUT "$UPLOAD_URL" \
-H "Content-Type: application/zip" \
--data-binary @mytemplate.zip
```
The upload is successful when you receive a `200 OK` status code.
##### 4. Monitor deployment status
After uploading, poll the sandbox status endpoint to track the build and deployment progress.
Make a GET request to `https://api.blaxel.ai/v0/sandboxes/`, where SANDBOX-NAME is the `metadata.name` specified in the initial POST request.
```bash theme={null}
watch -n 1 'curl -s -X GET https://api.blaxel.ai/v0/sandboxes/my-sandbox -H "Authorization: Bearer $BL_API_KEY" -H "X-Blaxel-Workspace: $BL_WORKSPACE" | jq -r ".status"'
```
The `status` field of the response will progress through these values:
| Status | Description |
| ------------- | ------------------------------------------ |
| `UPLOADING` | Code archive is being uploaded |
| `BUILDING` | Docker image is being built |
| `DEPLOYING` | Container is being deployed to the cluster |
| `DEPLOYED` | Sandbox is ready to use |
| `FAILED` | Deployment failed (check build logs) |
| `DEACTIVATED` | Sandbox has been deactivated |
Continue polling every 3-5 seconds until the status reaches `DEPLOYED` or `FAILED`.
A first sandbox from that image is automatically created on Blaxel once deployment succeeds. You can safely delete the sandbox and keep using the image for new sandboxes.
##### Example script
Here's a complete example script that performs all the steps above:
```bash Shell expandable theme={null}
#!/bin/bash
# Real deployment script that executes the documented API workflow
set -e
# Configuration
SANDBOX_NAME="my-custom-sandbox-$(date +%s)"
SOURCE_DIR="mytemplate"
ZIP_FILE="mytemplate.zip"
BASE_URL="https://api.blaxel.ai/v0"
# Colors for output
GREEN='\033[0;32m'
RED='\033[0;31m'
YELLOW='\033[1;33m'
BLUE='\033[0;34m'
NC='\033[0m' # No Color
# Cleanup function
cleanup() {
if [ -f "$ZIP_FILE" ]; then
rm -f "$ZIP_FILE"
echo -e "\n${GREEN}✓ Cleaned up temporary files${NC}"
fi
}
# Set trap to cleanup on exit
trap cleanup EXIT
# Validate credentials
if [ -z "$BL_API_KEY" ]; then
echo -e "${RED}Error: BL_API_KEY not set${NC}"
echo "Get your API key from workspace settings and set it with:"
echo " export BL_API_KEY='your-api-key'"
exit 1
fi
if [ -z "$BL_WORKSPACE" ]; then
echo -e "${RED}Error: BL_WORKSPACE not set${NC}"
echo "Set your workspace name with:"
echo " export BL_WORKSPACE='your-workspace-name'"
exit 1
fi
# Check if source directory exists
if [ ! -d "$SOURCE_DIR" ]; then
echo -e "${RED}Error: $SOURCE_DIR directory not found${NC}"
exit 1
fi
# Create ZIP archive
echo -e "${BLUE}Creating ZIP archive from $SOURCE_DIR...${NC}"
cd "$SOURCE_DIR"
zip -q -r "../${ZIP_FILE}" .
cd ..
FILE_SIZE=$(wc -c < "$ZIP_FILE" | tr -d ' ')
echo -e "${GREEN}✓ ZIP archive created: $ZIP_FILE ($FILE_SIZE bytes)${NC}\n"
# Step 1: Create sandbox and get upload URL
echo -e "${BLUE}[1/4] Creating sandbox '$SANDBOX_NAME'...${NC}"
# Create temporary file for headers
HEADERS_FILE=$(mktemp)
CREATE_RESPONSE=$(curl -s -D "$HEADERS_FILE" -w "\n%{http_code}" -X POST "$BASE_URL/sandboxes?upload=true" \
-H "Authorization: Bearer $BL_API_KEY" \
-H "X-Blaxel-Workspace: $BL_WORKSPACE" \
-H "Content-Type: application/json" \
-d '{
"apiVersion": "blaxel.ai/v1alpha1",
"kind": "Sandbox",
"metadata": {
"name": "'"$SANDBOX_NAME"'"
},
"spec": {
"runtime": {
"memory": 2048
},
"region": "us-pdx-1"
}
}')
HTTP_CODE=$(echo "$CREATE_RESPONSE" | tail -n 1)
RESPONSE_BODY=$(echo "$CREATE_RESPONSE" | sed '$d')
if [ "$HTTP_CODE" != "200" ] && [ "$HTTP_CODE" != "201" ]; then
echo -e "${RED}✗ Failed to create sandbox (HTTP $HTTP_CODE)${NC}"
echo "$RESPONSE_BODY" | jq . 2>/dev/null || echo "$RESPONSE_BODY"
rm -f "$HEADERS_FILE"
exit 1
fi
# Extract upload URL from response headers
UPLOAD_URL=$(grep -i "x-blaxel-upload-url:" "$HEADERS_FILE" | cut -d' ' -f2- | tr -d '\r\n')
if [ -z "$UPLOAD_URL" ]; then
echo -e "${RED}✗ No upload URL received in response headers${NC}"
rm -f "$HEADERS_FILE"
exit 1
fi
rm -f "$HEADERS_FILE"
echo -e "${GREEN}✓ Sandbox created${NC}"
echo ""
# Step 2: Upload ZIP file
echo -e "${BLUE}[2/4] Uploading code archive ($FILE_SIZE bytes)...${NC}"
UPLOAD_RESPONSE=$(curl -s -w "%{http_code}" -X PUT "$UPLOAD_URL" \
-H "Content-Type: application/zip" \
--data-binary "@$ZIP_FILE")
HTTP_CODE="${UPLOAD_RESPONSE: -3}"
if [ "$HTTP_CODE" != "200" ]; then
echo -e "${RED}✗ Upload failed with status $HTTP_CODE${NC}"
exit 1
fi
echo -e "${GREEN}✓ Upload completed${NC}"
echo ""
# Step 3: Monitor deployment status
echo -e "${BLUE}[3/4] Monitoring deployment status...${NC}"
MAX_WAIT=900 # 15 minutes
START_TIME=$(date +%s)
LAST_STATUS=""
while true; do
# Check timeout
CURRENT_TIME=$(date +%s)
ELAPSED=$((CURRENT_TIME - START_TIME))
if [ $ELAPSED -gt $MAX_WAIT ]; then
echo -e "${RED}✗ Deployment timed out after $MAX_WAIT seconds${NC}"
exit 1
fi
# Get current status
STATUS_RESPONSE=$(curl -s -X GET "$BASE_URL/sandboxes/$SANDBOX_NAME" \
-H "Authorization: Bearer $BL_API_KEY" \
-H "X-Blaxel-Workspace: $BL_WORKSPACE")
STATUS=$(echo "$STATUS_RESPONSE" | jq -r '.status // empty')
if [ -z "$STATUS" ]; then
echo -e "${YELLOW}Warning: Could not get status, retrying...${NC}"
sleep 3
continue
fi
# Log status changes
if [ "$STATUS" != "$LAST_STATUS" ]; then
echo " Status: $STATUS"
LAST_STATUS=$STATUS
fi
# Check terminal states
if [ "$STATUS" = "DEPLOYED" ]; then
IMAGE=$(echo "$STATUS_RESPONSE" | jq -r '.spec.runtime.image // empty')
echo ""
echo -e "${GREEN}🎉 Deployment complete!${NC}"
echo "Sandbox: $SANDBOX_NAME"
echo "Image: $IMAGE"
echo ""
# Step 4: Show how to use it
echo -e "${BLUE}[4/4] How to use your sandbox:${NC}"
echo ""
echo "Run a command:"
echo " bl run sandbox $SANDBOX_NAME"
echo ""
echo "Get sandbox details:"
echo " bl get sandbox $SANDBOX_NAME"
echo ""
echo "View logs:"
echo " bl logs sandbox $SANDBOX_NAME"
echo ""
echo "Delete sandbox:"
echo " bl delete sandbox $SANDBOX_NAME"
echo ""
exit 0
elif [ "$STATUS" = "FAILED" ]; then
echo ""
echo -e "${RED}✗ Deployment failed${NC}"
echo ""
echo "Check the sandbox status for error details:"
echo " curl -s -X GET '$BASE_URL/sandboxes/$SANDBOX_NAME' \\"
echo " -H 'Authorization: Bearer \$BL_API_KEY' \\"
echo " -H 'X-Blaxel-Workspace: \$BL_WORKSPACE' | jq ."
exit 1
elif [ "$STATUS" = "DEACTIVATED" ] || [ "$STATUS" = "DEACTIVATING" ] || [ "$STATUS" = "DELETING" ]; then
echo ""
echo -e "${RED}✗ Unexpected status: $STATUS${NC}"
exit 1
fi
# Wait before next poll
sleep 3
done
```
```typescript TypeScript expandable theme={null}
import { SandboxInstance, settings } from "@blaxel/core";
import { execSync } from "node:child_process";
import { existsSync, readFileSync, statSync, unlinkSync } from "node:fs";
import { resolve } from "node:path";
const SANDBOX_NAME = `my-custom-sandbox-${Math.floor(Date.now() / 1000)}`;
const SOURCE_DIR = "mytemplate";
const ZIP_FILE = "mytemplate.zip";
async function poll() {
const maxWait = 900;
const startTime = Date.now();
let lastStatus: string | null = null;
while (true) {
if ((Date.now() - startTime) / 1000 > maxWait) {
console.log(`Deployment timed out after ${maxWait} seconds`);
process.exit(1);
}
try {
const sandbox = await SandboxInstance.get(SANDBOX_NAME);
const status = sandbox.status;
if (!status) {
console.log("Warning: Could not get status, retrying...");
await new Promise((r) => setTimeout(r, 3000));
continue;
}
if (status !== lastStatus) {
console.log(` Status: ${status}`);
lastStatus = status;
}
if (status === "DEPLOYED") {
const image = sandbox.spec?.runtime?.image;
console.log(
`\nDeployment complete!\nSandbox: ${SANDBOX_NAME}\nImage: ${image}\n`
);
return;
} else if (status === "FAILED") {
console.log(
`\nDeployment failed\n\nCheck build logs with:\n bl logs sandbox ${SANDBOX_NAME}`
);
process.exit(1);
} else if (
status === "DEACTIVATED" ||
status === "DEACTIVATING" ||
status === "DELETING"
) {
console.log(`\nUnexpected status: ${status}`);
process.exit(1);
}
} catch {
console.log("Warning: Could not get status, retrying...");
}
await new Promise((r) => setTimeout(r, 3000));
}
}
async function main() {
try {
if (!existsSync(SOURCE_DIR) || !statSync(SOURCE_DIR).isDirectory()) {
console.error(`Error: ${SOURCE_DIR} directory not found`);
process.exit(1);
}
console.log(`Creating ZIP archive from ${SOURCE_DIR}...`);
execSync(`zip -r ${resolve(ZIP_FILE)} .`, {
cwd: resolve(SOURCE_DIR),
stdio: "pipe",
});
const fileSize = statSync(ZIP_FILE).size;
console.log(`ZIP archive created: ${ZIP_FILE} (${fileSize} bytes)\n`);
console.log(`[1/4] Creating sandbox '${SANDBOX_NAME}'...`);
await settings.authenticate();
const createResponse = await fetch(
`${settings.baseUrl}/sandboxes?upload=true`,
{
method: "POST",
headers: {
...settings.headers,
"Content-Type": "application/json",
},
body: JSON.stringify({
metadata: { name: SANDBOX_NAME },
spec: {
runtime: { memory: 2048 },
region: "us-pdx-1",
},
}),
}
);
if (createResponse.status !== 200 && createResponse.status !== 201) {
console.error(
`Failed to create sandbox (HTTP ${createResponse.status})`
);
console.error(await createResponse.text());
process.exit(1);
}
const uploadUrl = createResponse.headers.get("x-blaxel-upload-url");
if (!uploadUrl) {
console.error("No upload URL received in response headers");
process.exit(1);
}
console.log("Sandbox created\n");
console.log(`[2/4] Uploading code archive (${fileSize} bytes)...`);
const uploadResponse = await fetch(uploadUrl, {
method: "PUT",
headers: { "Content-Type": "application/zip" },
body: readFileSync(ZIP_FILE),
});
if (uploadResponse.status !== 200) {
console.error(`Upload failed with status ${uploadResponse.status}`);
process.exit(1);
}
console.log("Upload completed\n");
console.log("[3/4] Monitoring deployment status...");
await poll();
console.log(`[4/4] How to use your sandbox:\n`);
console.log(`Run a command:\n bl run sandbox ${SANDBOX_NAME}\n`);
console.log(`Get sandbox details:\n bl get sandbox ${SANDBOX_NAME}\n`);
console.log(`View logs:\n bl logs sandbox ${SANDBOX_NAME}\n`);
console.log(`Delete sandbox:\n bl delete sandbox ${SANDBOX_NAME}\n`);
} finally {
if (existsSync(ZIP_FILE)) {
unlinkSync(ZIP_FILE);
console.log("Cleaned up temporary files");
}
}
}
main();
```
```python Python expandable theme={null}
import asyncio
import sys
import time
import zipfile
from pathlib import Path
import httpx
from blaxel.core import SandboxInstance, client
SANDBOX_NAME = f"my-custom-sandbox-{int(time.time())}"
SOURCE_DIR = "mytemplate"
ZIP_FILE = "mytemplate.zip"
try:
if not Path(SOURCE_DIR).is_dir():
print(f"Error: {SOURCE_DIR} directory not found")
sys.exit(1)
print(f"Creating ZIP archive from {SOURCE_DIR}...")
with zipfile.ZipFile(ZIP_FILE, "w", zipfile.ZIP_DEFLATED) as zf:
for file in Path(SOURCE_DIR).rglob("*"):
if file.is_file():
zf.write(file, file.relative_to(SOURCE_DIR))
file_size = Path(ZIP_FILE).stat().st_size
print(f"ZIP archive created: {ZIP_FILE} ({file_size} bytes)\n")
print(f"[1/4] Creating sandbox '{SANDBOX_NAME}'...")
httpx_client = client.get_httpx_client()
response = httpx_client.post(
"/sandboxes",
params={"upload": "true"},
json={
"metadata": {"name": SANDBOX_NAME},
"spec": {
"runtime": {"memory": 2048},
"region": "us-pdx-1",
},
},
timeout=30,
)
if response.status_code not in (200, 201):
print(f"Failed to create sandbox (HTTP {response.status_code})")
print(response.text)
sys.exit(1)
upload_url = response.headers.get("x-blaxel-upload-url")
if not upload_url:
print("No upload URL received in response headers")
sys.exit(1)
print("Sandbox created\n")
print(f"[2/4] Uploading code archive ({file_size} bytes)...")
with open(ZIP_FILE, "rb") as f:
upload_response = httpx.put(
upload_url,
content=f.read(),
headers={"Content-Type": "application/zip"},
timeout=300,
)
if upload_response.status_code != 200:
print(f"Upload failed with status {upload_response.status_code}")
sys.exit(1)
print("Upload completed\n")
print("[3/4] Monitoring deployment status...")
async def poll():
max_wait = 900
start_time = time.time()
last_status = None
while True:
if time.time() - start_time > max_wait:
print(f"Deployment timed out after {max_wait} seconds")
sys.exit(1)
try:
sandbox = await SandboxInstance.get(SANDBOX_NAME)
status = sandbox.status
except Exception:
print("Warning: Could not get status, retrying...")
await asyncio.sleep(3)
continue
if status is None:
print("Warning: Could not get status, retrying...")
await asyncio.sleep(3)
continue
if status != last_status:
print(f" Status: {status}")
last_status = status
if status == "DEPLOYED":
image = sandbox.spec.runtime.image if sandbox.spec and sandbox.spec.runtime else None
print(f"\nDeployment complete!\nSandbox: {SANDBOX_NAME}\nImage: {image}\n")
return
elif status == "FAILED":
print(f"\nDeployment failed\n\nCheck build logs with:\n bl logs sandbox {SANDBOX_NAME}")
sys.exit(1)
elif status in ("DEACTIVATED", "DEACTIVATING", "DELETING"):
print(f"\nUnexpected status: {status}")
sys.exit(1)
await asyncio.sleep(3)
asyncio.run(poll())
print(f"[4/4] How to use your sandbox:\n")
print(f"Run a command:\n bl run sandbox {SANDBOX_NAME}\n")
print(f"Get sandbox details:\n bl get sandbox {SANDBOX_NAME}\n")
print(f"View logs:\n bl logs sandbox {SANDBOX_NAME}\n")
print(f"Delete sandbox:\n bl delete sandbox {SANDBOX_NAME}\n")
finally:
if Path(ZIP_FILE).exists():
Path(ZIP_FILE).unlink()
print("Cleaned up temporary files")
```
The script accepts a source directory path containing the Dockerfile and related code and uses it to deploy a sandbox on Blaxel. It monitors the deployment status until completion and also cleans up temporary files.
To use this script, first export your API key and credentials as below:
```bash theme={null}
export BL_API_KEY=YOUR-API-KEY
export BL_WORKSPACE=YOUR-WORKSPACE-NAME
```
Create a sandbox directory named `mytemplate` with your custom Dockerfile and entrypoint script:
```bash theme={null}
mkdir -p mytemplate
```
Save and run the script as `deploy-sandbox.sh` (Shell), `index.ts` (TypeScript) or `main.py` (Python):
```bash Shell theme={null}
chmod +x deploy-sandbox.sh
./deploy-sandbox.sh
```
```typescript TypeScript theme={null}
node index.ts
```
```python Python theme={null}
python main.py
```
### Deploy from a private registry
Instead of building from source, you can point `blaxel.toml` directly at an image in a private registry:
```toml theme={null}
type = "sandbox"
name = "my-custom-sandbox"
image = "docker.io/myuser/my-sandbox:latest"
[runtime]
memory = 4096
```
The image must include the [sandbox API binary](#2-customize-the-dockerfile).
You can then push or deploy the image using `bl push` or `bl deploy` as usual.
To configure registry credentials, you have three options (listed in priority order):
1. Pass the credentials inline to `bl push` or `bl deploy` with the `--registry-cred` flag
```shell theme={null}
bl push --image docker.io/myuser/my-sandbox:latest --name my-custom-sandbox --registry-cred "docker.io=myuser:mypassword"
```
2. Pass the credentials from a different configuration file to `bl push` or `bl deploy` with the `--docker-config` flag
```shell theme={null}
bl push --image docker.io/myuser/my-sandbox:latest --name my-custom-sandbox --docker-config ~/.docker/config.json
```
3. Place a `.docker/config.json` in your project directory using the standard Docker config format (you can copy your existing `~/.docker/config.json`). The file will be automatically detected and used by `bl push` or `bl deploy`.
Add `.docker/config.json` to your `.gitignore` to avoid committing registry credentials to source control.
```json theme={null}
{
"auths": {
"docker.io": {
"auth": ""
}
}
}
```
The following registries are currently supported:
* Docker Hub
* GitHub Container Registry
* Google Artifact Registry
* Amazon ECR
* Any private registry which supports Basic auth
### Use a custom image
Once an image is successfully pushed, you can spawn new sandboxes instantly by using its image ID.
Use the following command to retrieve the image ID of the most recently pushed image:
```docker theme={null}
# Retrieve your IMAGE_ID
bl get image sandbox/mytemplate --latest
```
```typescript TypeScript theme={null}
import { SandboxInstance } from "@blaxel/core";
// Create a new sandbox
const sandbox = await SandboxInstance.create({
name: "my-sandbox-from-template",
image: "IMAGE_ID",
memory: 4096,
region: "us-pdx-1",
ports: [{ name: "nextjs-dev", target: 3000 }, { name: "another-api", target: 8888 }]
});
```
```python Python theme={null}
from blaxel.core import SandboxInstance
sandbox = await SandboxInstance.create({
"name": "my-sandbox-from-template",
"image": "IMAGE_ID",
"memory": 4096,
"region": "us-pdx-1",
"ports": [{ "name": "nextjs-dev", "target": 3000 }, { "name": "another-api", "target": 8888 }]
})
```
### Update a custom image
To update an existing custom image:
1. Modify your Dockerfile or configuration
2. Rebuild locally to test changes
3. Push the new version:
```bash theme={null}
bl push
```
The new revision becomes available while the old one remains accessible.
## Share images across workspaces and accounts
Once you have a custom image, you can share it with other workspaces in the same [account](/Security/Workspace-access-control), or with other accounts - for example, to promote an image from `development` to `production` without rebuilding or re-pushing, or to share an image between different teams. Only the metadata record is copied to the target workspace or account; the underlying storage stays in the source.
When you share an image:
1. The metadata is copied to the target workspace or account, pointing to the same underlying data in the source.
2. The target workspace or account can use the shared image to create sandboxes, just like a locally-owned image.
3. Storage billing stays with the source workspace or account.
4. New tags pushed to the source image are automatically propagated to all workspaces and accounts it is shared with.
Shared images in the consuming workspace or account include a `sourceWorkspace` field. In the [Blaxel Console](https://app.blaxel.ai), they are marked with a badge showing the source workspace or account name.
### Prerequisites
* When sharing between workspaces or accounts, you must be an **administrator** of the source workspace. When sharing between accounts, your share request will be completed only when it receives approval from an administrator of the target account.
* The image must be **locally owned** in the source workspace or account. You cannot re-share an image that was shared to you from elsewhere.
### Share an image
#### Blaxel Console
To share with another workspace in the same account:
1. Navigate to the **Images** page in the source workspace.
2. Click the actions menu (three dots) on the image you want to share.
3. Select **Share**.
4. In the dialog, select the **Same account** tab.
5. Select the target workspace from the dropdown.
6. Click **Share** to confirm.
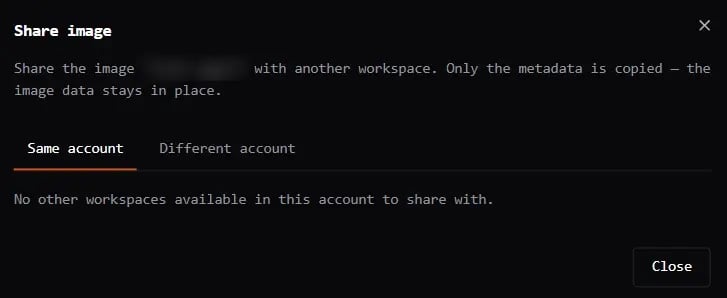 The shared image appears immediately in the target workspace's image list.
To share with another account:
1. Navigate to the **Images** page in the source workspace.
2. Click the actions menu (three dots) on the image you want to share.
3. Select **Share**.
4. In the dialog, select the **Different account** tab.
5. Select the target account from the dropdown.
6. Click **Share** to confirm.
The shared image appears immediately in the target workspace's image list.
To share with another account:
1. Navigate to the **Images** page in the source workspace.
2. Click the actions menu (three dots) on the image you want to share.
3. Select **Share**.
4. In the dialog, select the **Different account** tab.
5. Select the target account from the dropdown.
6. Click **Share** to confirm.
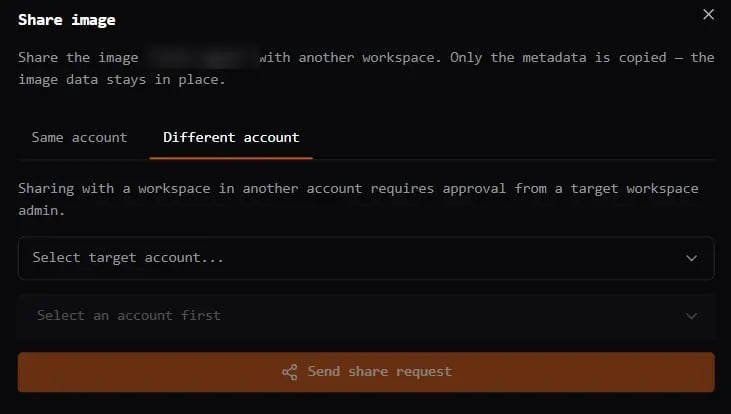 The share request must be approved by an administrator of the target account.
#### Blaxel CLI
Currently, the Blaxel CLI only supports image sharing across workspaces. To share images across accounts, use the Blaxel Console or the Management API instead.
Use the [`bl share image`](/cli-reference/commands/bl_share_image) command:
```bash theme={null}
bl share image sandbox/ --workspace
```
Sharing applies to the entire image (all tags). Tag-qualified references like `sandbox/my-template:v1.0` are not accepted.
#### Management API
For sharing between workspaces in the same account:
```bash theme={null}
curl -X POST "https://api.blaxel.ai/v0/images/sandbox/{imageName}/share" \
-H "Authorization: Bearer $BL_API_KEY" \
-H "X-Blaxel-Workspace: $BL_WORKSPACE" \
-H "Content-Type: application/json" \
-d '{"targetWorkspace": "production"}'
```
For sharing between workspaces in different accounts:
```bash theme={null}
curl -X POST "https://api.blaxel.ai/v0/images/sandbox/{imageName}/share" \
-H "Authorization: Bearer $BL_API_KEY" \
-H "X-Blaxel-Workspace: $SOURCE_WORKSPACE" \
-H "Content-Type: application/json" \
-d '{
"targetWorkspace": "production",
"targetAccountId": "TARGET-ACCOUNT-ID"
}'
```
The target account ID can be obtained from the **Workspace settings** page of the Blaxel Console.
### List shared images
#### Blaxel Console
On the image detail page in the [Blaxel Console](https://app.blaxel.ai), images shared across workspaces or accounts are listed with the option to revoke sharing for each workspace or account individually.
#### Management API
```bash theme={null}
curl -X GET "https://api.blaxel.ai/v0/images/sandbox/{imageName}/share" \
-H "Authorization: Bearer $BL_API_KEY" \
-H "X-Blaxel-Workspace: $BL_WORKSPACE"
```
### Unshare an image
Unsharing removes the metadata record from the target workspace or account. The image data in the source workspace is not affected.
You cannot delete an image (or individual tags) while it is shared. You must unshare from all connected workspaces or accounts first.
After unsharing, any deployments in the target workspace or account that reference the shared image will fail on their next restart or scale-up. Make sure no active deployments depend on the image before unsharing.
#### Blaxel Console
1. Navigate to the **Images** page in the source workspace.
2. Open the image detail page.
3. In the shared workspaces list, click **Unshare** next to the target workspace or account you want to revoke.
#### Blaxel CLI
Use the [`bl unshare image`](/cli-reference/commands/bl_unshare_image) command:
```bash theme={null}
bl unshare image sandbox/ --workspace
```
#### Management API
```bash theme={null}
curl -X DELETE "https://api.blaxel.ai/v0/images/sandbox/{imageName}/share/{targetWorkspace}" \
-H "Authorization: Bearer $BL_API_KEY" \
-H "X-Blaxel-Workspace: $BL_WORKSPACE"
```
### Billing
Storage billing is tied to the source workspace. Metering and costs remain with the workspace that originally pushed the image, regardless of how many workspaces or accounts it is shared with.
The consuming workspace or account pays nothing for image storage of shared images.
### Constraints and limitations
* **No re-sharing**: A shared image cannot be re-shared from the consuming workspace to a third workspace or account. Only the original owner can share.
* **Deletion protection**: You cannot delete an image (or individual tags) while it is shared with other workspaces or accounts. You must unshare from all target workspaces first.
* **Whole image only**: Sharing applies to the entire image with all its tags. You cannot share individual tags.
* **Admin-only**: Both sharing and unsharing require administrator permissions.
## Best practices
### 1. Optimize for cold starts
* Use smaller base images (Alpine when possible)
* Minimize layers in Dockerfile
* Pre-install only essential packages
* Defer optional installations to runtime
### 2. Cache dependencies
```docker theme={null}
# Good: Cache package installations
COPY package*.json ./
RUN npm ci --only=production
COPY . .
# Bad: Invalidates cache on any file change
COPY . .
RUN npm install
```
### 3. Security considerations
* Don’t include secrets in images
* Use Blaxel’s secrets management for sensitive data
* Keep base images updated
* Scan for vulnerabilities regularly
### 4. Resource optimization
Choose appropriate resources for your use case:
| Use Case | Memory |
| --------------------- | ------ |
| Light development | 2GB |
| Small web application | 4GB |
| Full-stack web | 8GB |
Pre-populate volumes with files for faster environment setup.
Understand accounts, workspaces, and admin permissions.
The share request must be approved by an administrator of the target account.
#### Blaxel CLI
Currently, the Blaxel CLI only supports image sharing across workspaces. To share images across accounts, use the Blaxel Console or the Management API instead.
Use the [`bl share image`](/cli-reference/commands/bl_share_image) command:
```bash theme={null}
bl share image sandbox/ --workspace
```
Sharing applies to the entire image (all tags). Tag-qualified references like `sandbox/my-template:v1.0` are not accepted.
#### Management API
For sharing between workspaces in the same account:
```bash theme={null}
curl -X POST "https://api.blaxel.ai/v0/images/sandbox/{imageName}/share" \
-H "Authorization: Bearer $BL_API_KEY" \
-H "X-Blaxel-Workspace: $BL_WORKSPACE" \
-H "Content-Type: application/json" \
-d '{"targetWorkspace": "production"}'
```
For sharing between workspaces in different accounts:
```bash theme={null}
curl -X POST "https://api.blaxel.ai/v0/images/sandbox/{imageName}/share" \
-H "Authorization: Bearer $BL_API_KEY" \
-H "X-Blaxel-Workspace: $SOURCE_WORKSPACE" \
-H "Content-Type: application/json" \
-d '{
"targetWorkspace": "production",
"targetAccountId": "TARGET-ACCOUNT-ID"
}'
```
The target account ID can be obtained from the **Workspace settings** page of the Blaxel Console.
### List shared images
#### Blaxel Console
On the image detail page in the [Blaxel Console](https://app.blaxel.ai), images shared across workspaces or accounts are listed with the option to revoke sharing for each workspace or account individually.
#### Management API
```bash theme={null}
curl -X GET "https://api.blaxel.ai/v0/images/sandbox/{imageName}/share" \
-H "Authorization: Bearer $BL_API_KEY" \
-H "X-Blaxel-Workspace: $BL_WORKSPACE"
```
### Unshare an image
Unsharing removes the metadata record from the target workspace or account. The image data in the source workspace is not affected.
You cannot delete an image (or individual tags) while it is shared. You must unshare from all connected workspaces or accounts first.
After unsharing, any deployments in the target workspace or account that reference the shared image will fail on their next restart or scale-up. Make sure no active deployments depend on the image before unsharing.
#### Blaxel Console
1. Navigate to the **Images** page in the source workspace.
2. Open the image detail page.
3. In the shared workspaces list, click **Unshare** next to the target workspace or account you want to revoke.
#### Blaxel CLI
Use the [`bl unshare image`](/cli-reference/commands/bl_unshare_image) command:
```bash theme={null}
bl unshare image sandbox/ --workspace
```
#### Management API
```bash theme={null}
curl -X DELETE "https://api.blaxel.ai/v0/images/sandbox/{imageName}/share/{targetWorkspace}" \
-H "Authorization: Bearer $BL_API_KEY" \
-H "X-Blaxel-Workspace: $BL_WORKSPACE"
```
### Billing
Storage billing is tied to the source workspace. Metering and costs remain with the workspace that originally pushed the image, regardless of how many workspaces or accounts it is shared with.
The consuming workspace or account pays nothing for image storage of shared images.
### Constraints and limitations
* **No re-sharing**: A shared image cannot be re-shared from the consuming workspace to a third workspace or account. Only the original owner can share.
* **Deletion protection**: You cannot delete an image (or individual tags) while it is shared with other workspaces or accounts. You must unshare from all target workspaces first.
* **Whole image only**: Sharing applies to the entire image with all its tags. You cannot share individual tags.
* **Admin-only**: Both sharing and unsharing require administrator permissions.
## Best practices
### 1. Optimize for cold starts
* Use smaller base images (Alpine when possible)
* Minimize layers in Dockerfile
* Pre-install only essential packages
* Defer optional installations to runtime
### 2. Cache dependencies
```docker theme={null}
# Good: Cache package installations
COPY package*.json ./
RUN npm ci --only=production
COPY . .
# Bad: Invalidates cache on any file change
COPY . .
RUN npm install
```
### 3. Security considerations
* Don’t include secrets in images
* Use Blaxel’s secrets management for sensitive data
* Keep base images updated
* Scan for vulnerabilities regularly
### 4. Resource optimization
Choose appropriate resources for your use case:
| Use Case | Memory |
| --------------------- | ------ |
| Light development | 2GB |
| Small web application | 4GB |
| Full-stack web | 8GB |
Pre-populate volumes with files for faster environment setup.
Understand accounts, workspaces, and admin permissions.