> ## Documentation Index
> Fetch the complete documentation index at: https://docs.blaxel.ai/llms.txt
> Use this file to discover all available pages before exploring further.
# Domain capture
> Verify your company's email domain on Blaxel to control which login methods your team can use and automatically onboard new users to workspaces.
## Overview
Domain capture lets you claim ownership of your organization's email domain (e.g. `acme.com`) and then decide exactly how users from that domain can sign in. You can restrict logins to specific methods (Google, SSO (SAML), or email passwordless) and automatically add new users to your workspaces when they first sign in.
This feature is available to all account administrators at no extra cost.
SAML SSO and Directory Sync are enterprise features built on top of domain verification. See [SSO & Directory Sync](/Security/SSO-Directory-sync) if you need those.
## Prerequisites
* You must be an account administrator.
* You must have access to your domain's DNS settings to add a TXT record.
## Step 1: Add a domain
Go to **Account Settings** → **Identity & Access**.
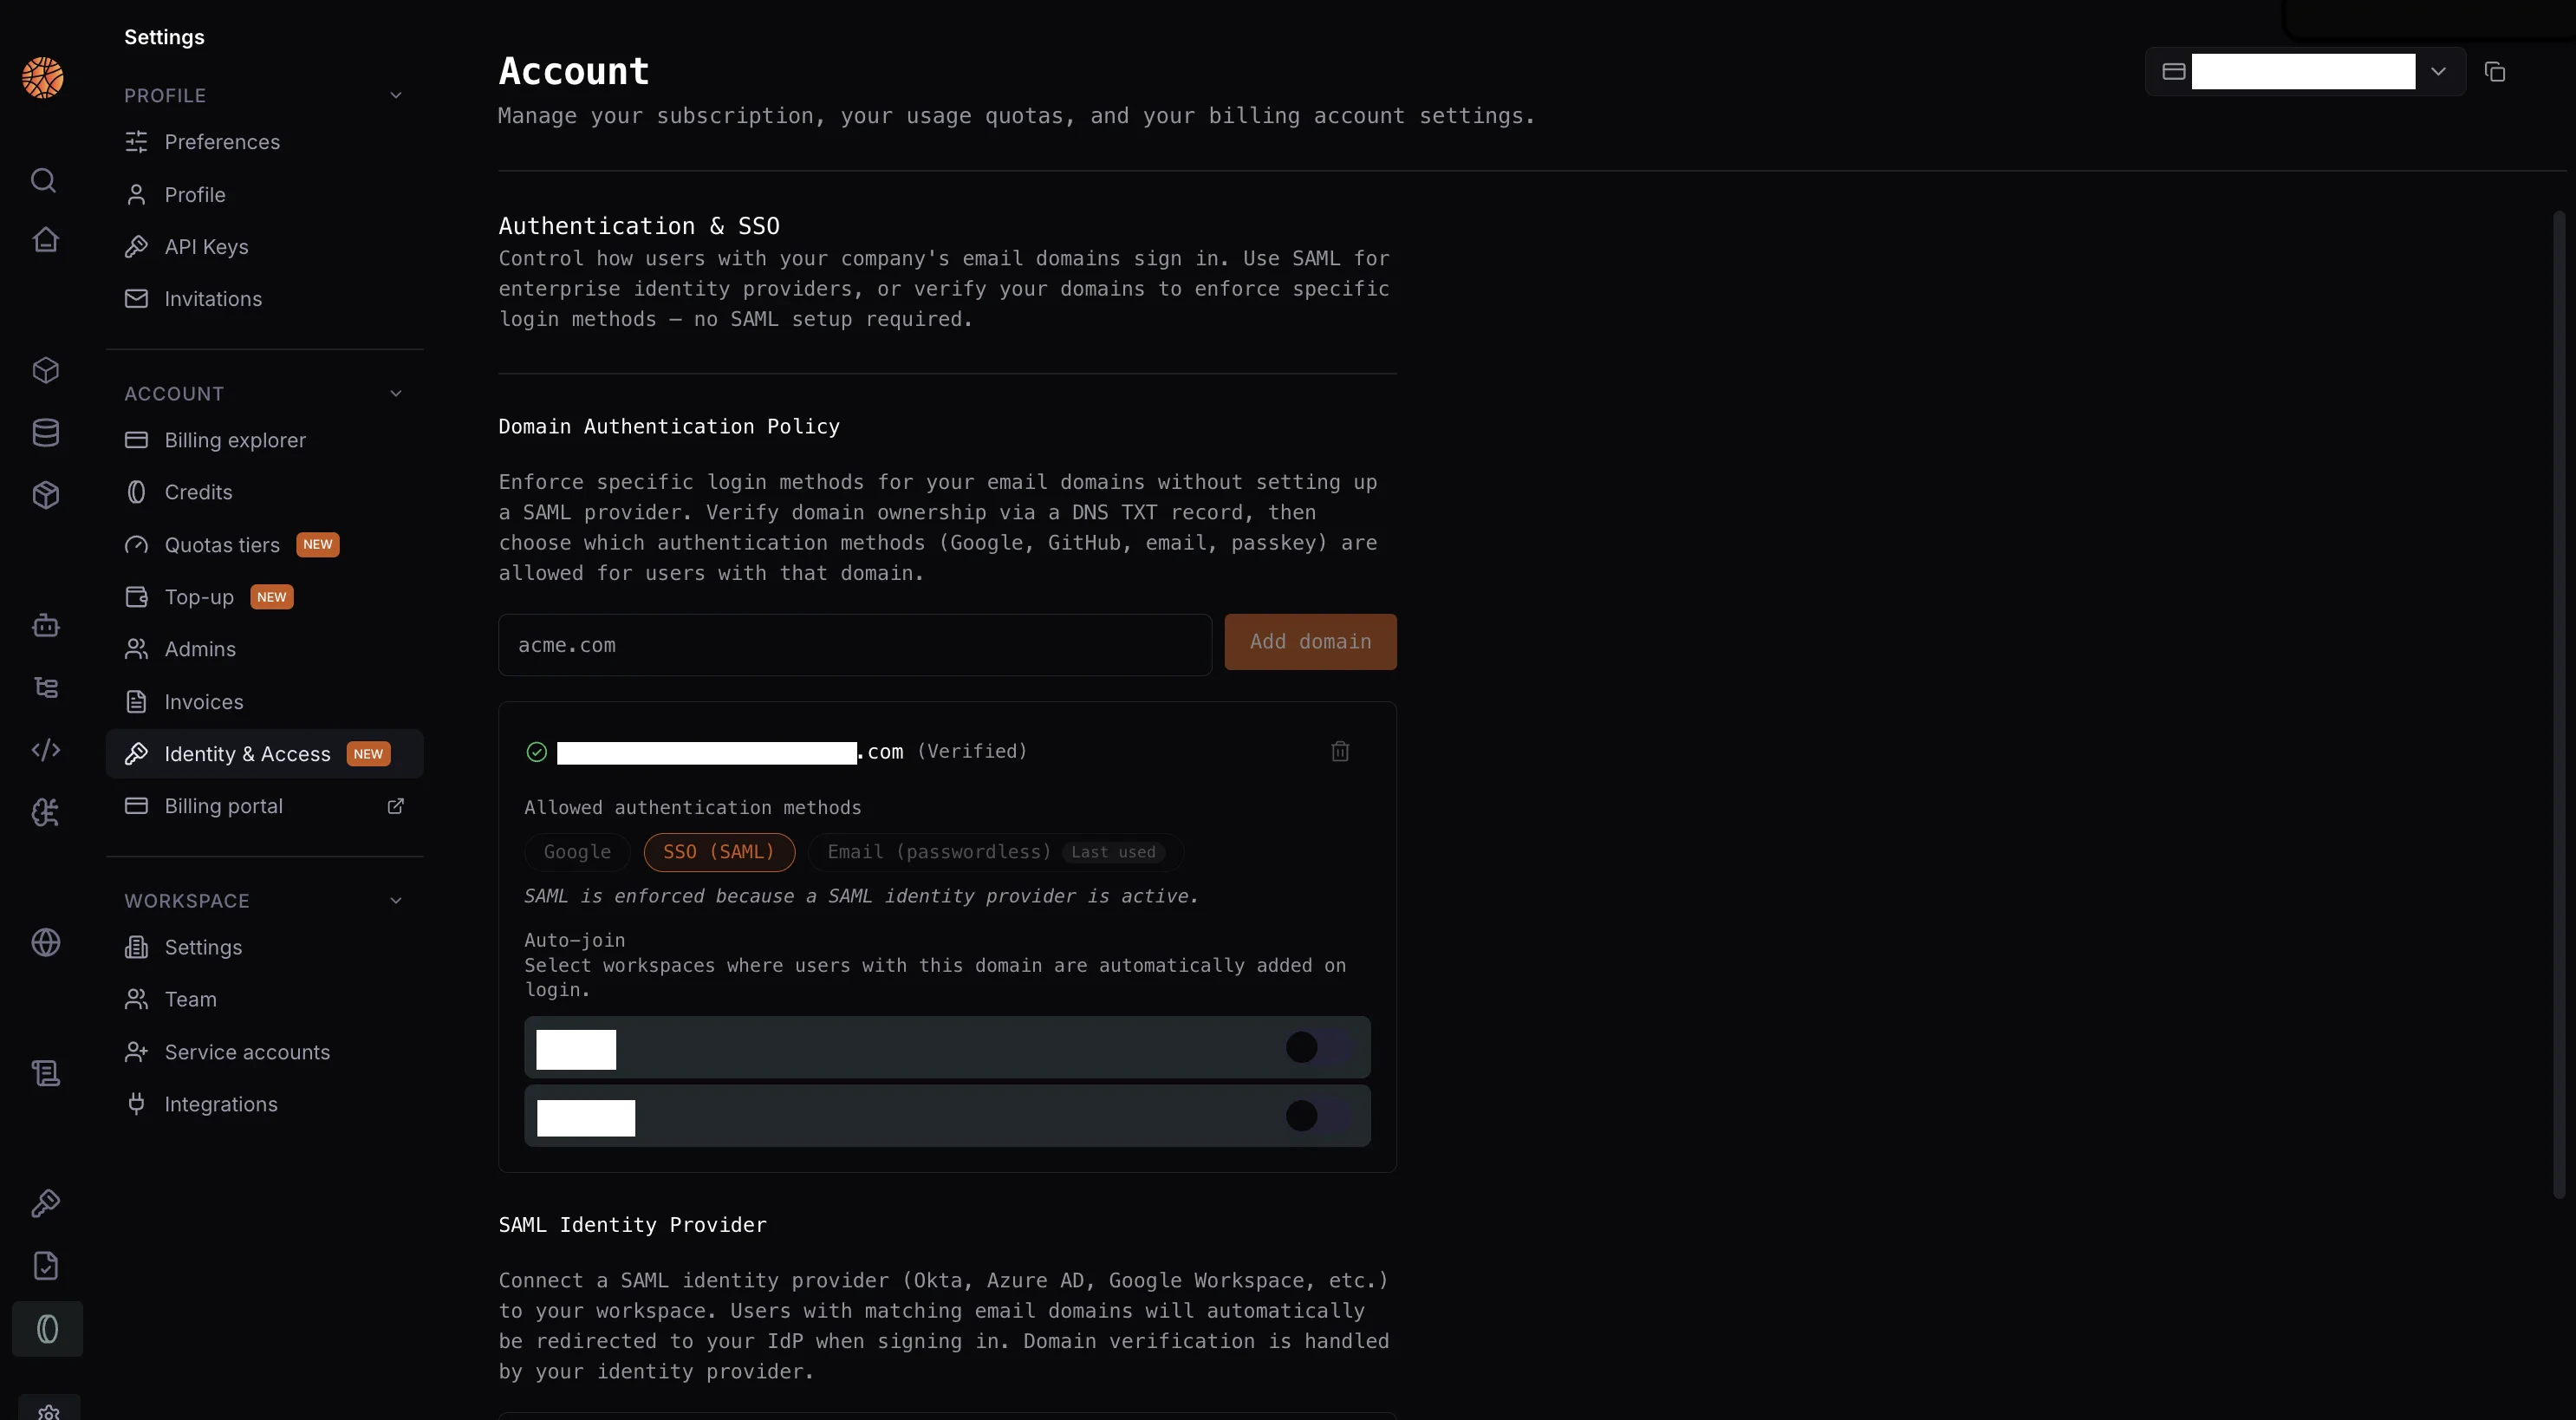 Type your company's email domain (e.g. `acme.com`) in the input field and click **Add domain**.
The domain appears in the list with a **Pending** status. It will remain inactive until you complete DNS verification.
## Step 2: Verify via DNS TXT record
To prove you own the domain, add a DNS TXT record provided by Blaxel.
Click **Show DNS** on the pending domain row.
Type your company's email domain (e.g. `acme.com`) in the input field and click **Add domain**.
The domain appears in the list with a **Pending** status. It will remain inactive until you complete DNS verification.
## Step 2: Verify via DNS TXT record
To prove you own the domain, add a DNS TXT record provided by Blaxel.
Click **Show DNS** on the pending domain row.
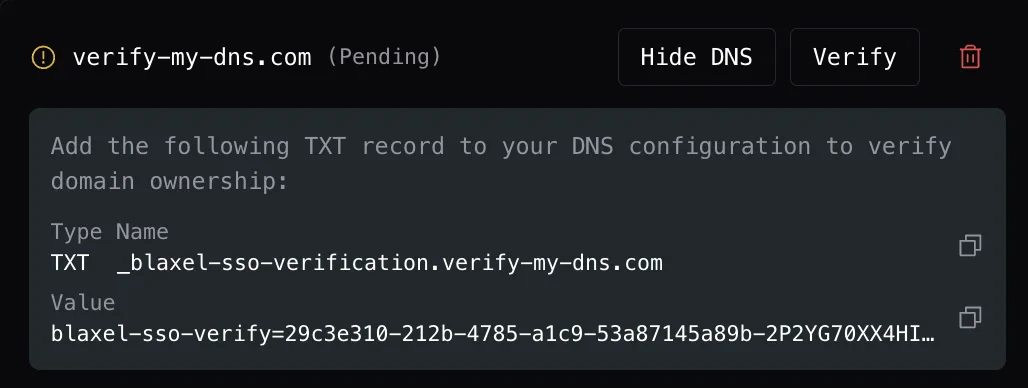 You'll see two values:
* **Name**: the hostname to add the record to (e.g. `_blaxel-sso-verification.yourdomain.com`)
* **Value**: the verification string starting with `blaxel-sso-verify=...`
Click the copy icon next to each value.
Log in to your DNS provider (Cloudflare, Route 53, GoDaddy, etc.) and add a new TXT record with the name and value you copied.
DNS propagation typically takes a few minutes, but can take up to 48 hours in rare cases.
Return to **Account Settings** → **Identity & Access** and click **Verify** on the domain row.
Once verified, the domain status changes to **Verified** (green checkmark) and additional options appear below it.
If verification fails, double-check that the TXT record name and value are entered exactly as shown. Some DNS providers automatically append the root domain. Confirm the full record name in your DNS provider's interface.
## Step 3: Set allowed auth methods
After your domain is verified, you can restrict which login methods users from that domain can use.
You'll see two values:
* **Name**: the hostname to add the record to (e.g. `_blaxel-sso-verification.yourdomain.com`)
* **Value**: the verification string starting with `blaxel-sso-verify=...`
Click the copy icon next to each value.
Log in to your DNS provider (Cloudflare, Route 53, GoDaddy, etc.) and add a new TXT record with the name and value you copied.
DNS propagation typically takes a few minutes, but can take up to 48 hours in rare cases.
Return to **Account Settings** → **Identity & Access** and click **Verify** on the domain row.
Once verified, the domain status changes to **Verified** (green checkmark) and additional options appear below it.
If verification fails, double-check that the TXT record name and value are entered exactly as shown. Some DNS providers automatically append the root domain. Confirm the full record name in your DNS provider's interface.
## Step 3: Set allowed auth methods
After your domain is verified, you can restrict which login methods users from that domain can use.
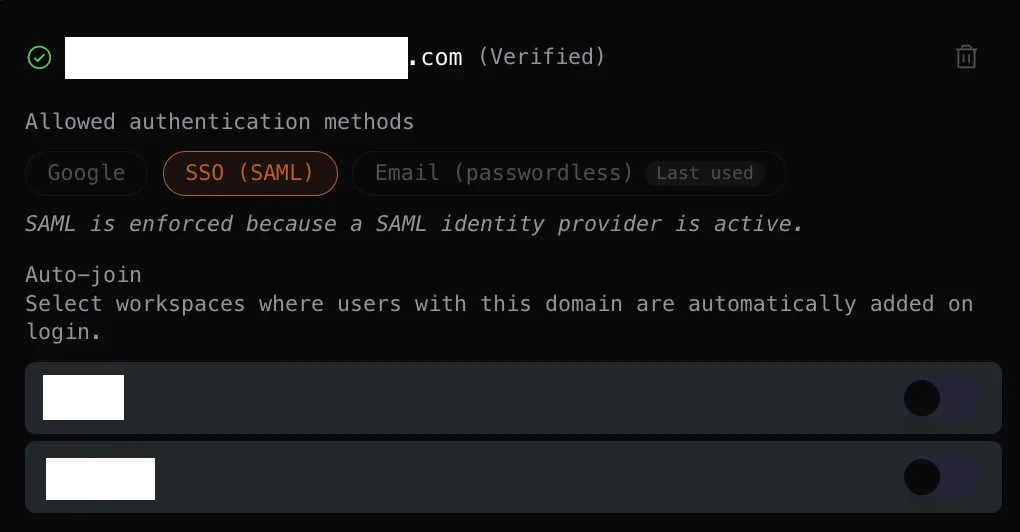 Click a method badge to toggle it on or off:
| Method | Description |
| ------------------------ | ---------------------------------------------------------------- |
| **Google** | Sign in with a Google account |
| **SSO (SAML)** | Sign in through your SAML identity provider (requires SSO setup) |
| **Email (passwordless)** | Sign in via email magic link or OTP |
If no methods are selected, there is no restriction and users can sign in with any available method.
If SAML SSO is configured and active on your account, **SSO (SAML)** becomes the only allowed method automatically and the other toggles are locked. See [SSO & Directory Sync](/Security/SSO-Directory-sync).
## Step 4: Configure auto-join workspaces
You can automatically add new users to one or more workspaces the first time they sign in with your verified domain.
Under **Auto-join**, toggle on any workspace to enable automatic membership for users from that domain.
Users who are already logged in when domain capture is toggled on will not be automatically added to the workspace until they log out and log back in.
If Directory Sync is also active, workspace membership may be managed by two systems simultaneously. Prefer using Directory Sync group mappings to control workspace membership when Directory Sync is configured.
## Removing a domain
Click the trash icon on any domain row to remove it. You'll be asked to confirm before deletion.
A domain that is actively linked to a SAML SSO connection cannot be deleted until the SSO connection is removed first.
## Multi-factor authentication
Multi-factor authentication (MFA) is available for all login methods except SAML/SSO. Users can enroll a TOTP authenticator app or an SMS factor from their account settings and will be prompted for the second factor at each login. MFA is not available when SAML SSO is active, since identity verification is handled by your identity provider.
## Related
* [SSO & Directory Sync](/Security/SSO-Directory-sync)
* [Workspace Access Control](/Security/Workspace-access-control)
Click a method badge to toggle it on or off:
| Method | Description |
| ------------------------ | ---------------------------------------------------------------- |
| **Google** | Sign in with a Google account |
| **SSO (SAML)** | Sign in through your SAML identity provider (requires SSO setup) |
| **Email (passwordless)** | Sign in via email magic link or OTP |
If no methods are selected, there is no restriction and users can sign in with any available method.
If SAML SSO is configured and active on your account, **SSO (SAML)** becomes the only allowed method automatically and the other toggles are locked. See [SSO & Directory Sync](/Security/SSO-Directory-sync).
## Step 4: Configure auto-join workspaces
You can automatically add new users to one or more workspaces the first time they sign in with your verified domain.
Under **Auto-join**, toggle on any workspace to enable automatic membership for users from that domain.
Users who are already logged in when domain capture is toggled on will not be automatically added to the workspace until they log out and log back in.
If Directory Sync is also active, workspace membership may be managed by two systems simultaneously. Prefer using Directory Sync group mappings to control workspace membership when Directory Sync is configured.
## Removing a domain
Click the trash icon on any domain row to remove it. You'll be asked to confirm before deletion.
A domain that is actively linked to a SAML SSO connection cannot be deleted until the SSO connection is removed first.
## Multi-factor authentication
Multi-factor authentication (MFA) is available for all login methods except SAML/SSO. Users can enroll a TOTP authenticator app or an SMS factor from their account settings and will be prompted for the second factor at each login. MFA is not available when SAML SSO is active, since identity verification is handled by your identity provider.
## Related
* [SSO & Directory Sync](/Security/SSO-Directory-sync)
* [Workspace Access Control](/Security/Workspace-access-control)