> ## Documentation Index
> Fetch the complete documentation index at: https://docs.blaxel.ai/llms.txt
> Use this file to discover all available pages before exploring further.
# Deploy Claude Agent SDK agents on Blaxel
> Deploy a Claude Agent SDK agent to Blaxel Agents Hosting as a serverless auto-scalable API, and colocate it close to the sandboxes it works on.
[Claude Agent SDK](https://platform.claude.com/docs/en/agent-sdk/overview) is a library for building autonomous AI agents using Claude Code. You can deploy your Claude Agent SDK projects to Blaxel with minimal code editing (and zero configuration), enabling you to colocate them close to the [sandboxes](/Sandboxes/Overview) the agents work on.
## Prerequisites
* An Anthropic API key, required by Claude Agent SDK. If not, [sign up for an Anthropic account](https://platform.claude.com/) and obtain an API key.
* A Blaxel account. If not, [sign up for a Blaxel account](https://blaxel.ai).
## 1. Install the Blaxel CLI and log in to Blaxel
The main way to deploy an agent on Blaxel is with the [Blaxel CLI](../cli-reference/introduction). This method is detailed in this tutorial. Alternatively you can [connect a GitHub repository](/Agents/Github-integration) - any push to the `main` branch of the repository will automatically update the deployment on Blaxel - or deploy from a variety of pre-built templates using the Blaxel Console.
[Install the Blaxel CLI](../cli-reference/introduction) and log in to Blaxel using this command:
```bash theme={null}
bl login
```
## 2. Install required dependencies
Create a directory for the project:
```shell theme={null}
mkdir assistant-agent && cd assistant-agent
```
The best way to deploy this project is through [Blaxel Agents Hosting](/Agents/Overview), which uses the same underlying infrastructure as sandboxes. Agents deployed on Blaxel Agents Hosting must expose an HTTP endpoint for requests.
In your project directory, install the [Claude Agent SDK](https://platform.claude.com/docs/en/agent-sdk/overview) for the agent loop and [Express](https://expressjs.com/) (TypeScript) / [FastAPI](https://fastapi.tiangolo.com/) (Python) to handle HTTP requests and responses:
```shell TypeScript (npm) theme={null}
npm init # if new project
npm install @anthropic-ai/claude-agent-sdk express tsx typescript
```
```shell TypeScript (pnpm) theme={null}
pnpm init # if new project
pnpm install @anthropic-ai/claude-agent-sdk express tsx typescript
```
```shell TypeScript (yarn) theme={null}
yarn init # if new project
yarn add @anthropic-ai/claude-agent-sdk express tsx typescript
```
```shell TypeScript (bun) theme={null}
bun init -m --yes # if new project
bun add @anthropic-ai/claude-agent-sdk express tsx typescript
```
```shell Python (pip) theme={null}
python3 -m venv .venv && source .venv/bin/activate # if new project
pip install claude-agent-sdk "fastapi[standard]"
```
## 3. Configure the environment
Add your Anthropic API key to a `.env` file in the project directory:
```shell theme={null}
echo "ANTHROPIC_API_KEY=your_key_here" > .env
```
## 4. Build the agent
In your project directory, create a file named `index.ts` (TypeScript) or `main.py` (Python) with the following code. Otherwise, [this other code](/Tutorials/Claude-Agent-SDK-MCP) shows how to **equip the agent with its own [Blaxel Sandbox](/Sandboxes/Overview).**
```typescript TypeScript theme={null}
import { query } from "@anthropic-ai/claude-agent-sdk";
import express from "express";
const host = process.env.HOST || "0.0.0.0";
const port = parseInt(process.env.PORT || "8000");
const app = express();
app.use(express.json());
app.post("/query", async (req, res) => {
const { prompt } = req.body;
if (!prompt) {
return res.status(400).json({ error: "prompt is required" });
}
try {
let response = "";
for await (const message of query({
prompt,
options: {
maxTurns: 1
}
})) {
if (message.type === "result") {
response = message.result;
break;
}
}
return res.json({ response });
} catch (error) {
return res.status(500).json({ error: error instanceof Error ? error.message : "Unknown error" });
}
});
app.listen(port, host, () => {
console.log(`Server listening on ${host}:${port}`);
});
```
```python Python theme={null}
import os
from fastapi import FastAPI, HTTPException, Request
from claude_agent_sdk import query, ClaudeAgentOptions
import uvicorn
host = os.getenv("HOST", "0.0.0.0")
port = int(os.getenv("PORT", "8000"))
app = FastAPI()
@app.post("/query")
async def query_endpoint(request: Request):
body = await request.json()
prompt = body.get("prompt")
if not prompt:
raise HTTPException(status_code=400, detail="prompt is required")
try:
response = ""
async for message in query(
prompt=prompt,
options=ClaudeAgentOptions(max_turns=1)
):
if hasattr(message, "result"):
response = message.result
break
return {"response": response}
except Exception as error:
raise HTTPException(
status_code=500,
detail=str(error) if error else "Unknown error"
)
if __name__ == "__main__":
print(f"Server listening on {host}:{port}")
uvicorn.run(app, host=host, port=port)
```
This creates a simple single-message agent with the Claude Agent SDK and an endpoint at `/query` to accept requests.
The agent's HTTP service must be bound to the host and port provided by Blaxel. Blaxel automatically injects these values as `HOST` and `PORT` variables into the runtime environment. It is important to read these variables in your code and ensure that the agent's HTTP service binds to the correct host and port.
In TypeScript, entrypoints are managed in the `scripts` section of the `package.json` file. Update your `package.json` to ensure that `start` and `dev` scripts are defined in the `scripts` section (TypeScript only).
```json TypeScript (npm/pnpm/yarn) theme={null}
{
"scripts": {
"start": "tsx index.ts",
"dev": "tsx --watch index.ts",
"build": "tsc"
},
// ...
}
```
```json TypeScript (bun) theme={null}
{
"scripts": {
"start": "bun run index.ts",
"dev": "bun --watch index.ts"
},
// ...
}
```
## 5. Enable telemetry (optional)
Instrumentation happens automatically when workloads run on Blaxel. To enable telemetry:
* Add the required package to your project:
```shell TypeScript (npm) theme={null}
npm install @blaxel/telemetry
```
```shell TypeScript (pnpm) theme={null}
pnpm install @blaxel/telemetry
```
```shell TypeScript (yarn) theme={null}
yarn add @blaxel/telemetry
```
```shell TypeScript (bun) theme={null}
bun install @blaxel/telemetry
```
```shell Python (pip) theme={null}
pip install "blaxel[telemetry]"
```
* Import the package in your code:
```typescript TypeScript theme={null}
import "@blaxel/telemetry";
```
```python Python theme={null}
import blaxel.telemetry
```
## 6. Test the agent locally
Test the agent by making the endpoint available locally:
```shell theme={null}
bl serve --hotreload &
```
This starts the agent locally while sandboxing the core agent logic, function calls and model API calls exactly as they would be when deployed on Blaxel. The `--hotreload` flag monitors and reloads the agent if the source code changes.
Note the host port on which the agent is running.
In another terminal, send the agent a request (update the endpoint URL below with the correct port number for your agent):
```shell theme={null}
curl -X POST http://0.0.0.0:1338/query \
-H "Content-Type: application/json" \
-d '{"prompt": "what is your name?"}'
```
You should see output similar to the following:
```shell theme={null}
{"response":"I'm Claude, an AI assistant made by Anthropic. I'm here to help you with coding tasks, file operations, terminal commands, and many other development-related activities. How can I help you today?"}
```
## 7. Deploy the agent on Blaxel
You're now ready to deploy the agent on Blaxel. When deploying to Blaxel, your workloads are served optimally to dramatically accelerate cold-start and latency while enforcing your deployment policies.
Deploying the agent is as simple as running the following command:
```shell theme={null}
bl deploy
```
The Blaxel CLI will prompt for the type of resource you are deploying. It will then auto-detect other details of your project and begin the deployment. The deployment process usually takes a few minutes, and you can watch progress from the Blaxel Console.
Blaxel uses its default `Dockerfile` to build your agent. If you already have a `Dockerfile` in the root of your project directory, Blaxel will automatically use that instead. You can set custom parameters for an agent deployment (for example, the agent name, memory, environment, or custom entrypoint) by adding an optional [`blaxel.toml file`](/deployment-reference) in the root of your project directory.
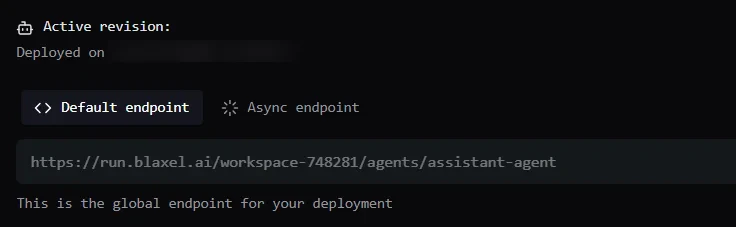
Once the deployment process is complete, log in to the [Blaxel Console](https://app.blaxel.ai/) to find the global endpoint for your agent service. Typically, this will be of the form `https://run.blaxel.ai/WORKSPACE/agents/AGENT`.
 ## 8. Test the agent on Blaxel
By default, agents deployed on Blaxel are not public. All agent requests must be authenticated via a [bearer token](../Security/Access-tokens). Requests can be made either via the Blaxel API or the Blaxel CLI.
Test the deployed agent by sending an authenticated request to its global endpoint (update the endpoint URL below with the correct endpoint URL for your agent, and modify the `prompt` as desired):
```bash theme={null}
curl -X POST https://run.blaxel.ai/$(bl workspace --current)/agents/assistant-agent/query \
-H "X-Blaxel-Workspace: $(bl workspace --current)" \
-H "X-Blaxel-Authorization: Bearer $(bl token)" \
-H "Content-Type: application/json" \
-d '{"prompt": "what is your name?"}'
```
You should see a response from the agent to your query.
You can also send a request through the Blaxel CLI:
```shell theme={null}
bl run agent assistant-agent/query --data '{"prompt":"what is your name?"}'
```
Although deployed agents are private by default, it is possible to [make an agent publicly available](/Agents/Query-agents#make-an-agent-public).
That's it! You're ready to start building and deploying agents with Claude Agent SDK on Blaxel.
## Resources
Want more info on developing and deploying agents on Blaxel? Check out the following resources:
Build an agent with Claude Agent SDK that can operate a Blaxel sandbox using MCP.
Deploy a self-hosted Claude Managed Agents environment on Blaxel.
Complete tutorial for using the TypeScript SDK to develop an agent using Blaxel services.
Complete tutorial for using the Python SDK to develop an agent using Blaxel services.
Complete tutorial for deploying AI agents to Blaxel.
Complete tutorial for managing variables and secrets when deploying to Blaxel.
## 8. Test the agent on Blaxel
By default, agents deployed on Blaxel are not public. All agent requests must be authenticated via a [bearer token](../Security/Access-tokens). Requests can be made either via the Blaxel API or the Blaxel CLI.
Test the deployed agent by sending an authenticated request to its global endpoint (update the endpoint URL below with the correct endpoint URL for your agent, and modify the `prompt` as desired):
```bash theme={null}
curl -X POST https://run.blaxel.ai/$(bl workspace --current)/agents/assistant-agent/query \
-H "X-Blaxel-Workspace: $(bl workspace --current)" \
-H "X-Blaxel-Authorization: Bearer $(bl token)" \
-H "Content-Type: application/json" \
-d '{"prompt": "what is your name?"}'
```
You should see a response from the agent to your query.
You can also send a request through the Blaxel CLI:
```shell theme={null}
bl run agent assistant-agent/query --data '{"prompt":"what is your name?"}'
```
Although deployed agents are private by default, it is possible to [make an agent publicly available](/Agents/Query-agents#make-an-agent-public).
That's it! You're ready to start building and deploying agents with Claude Agent SDK on Blaxel.
## Resources
Want more info on developing and deploying agents on Blaxel? Check out the following resources:
Build an agent with Claude Agent SDK that can operate a Blaxel sandbox using MCP.
Deploy a self-hosted Claude Managed Agents environment on Blaxel.
Complete tutorial for using the TypeScript SDK to develop an agent using Blaxel services.
Complete tutorial for using the Python SDK to develop an agent using Blaxel services.
Complete tutorial for deploying AI agents to Blaxel.
Complete tutorial for managing variables and secrets when deploying to Blaxel.