> ## Documentation Index
> Fetch the complete documentation index at: https://docs.blaxel.ai/llms.txt
> Use this file to discover all available pages before exploring further.
# Orchestrate Blaxel agents with n8n
> Build n8n workflows that forward chat messages to Blaxel-hosted AI agents via HTTP requests, with step-by-step setup and configuration.
This tutorial will walk you through how to integrate your AI agents —deployed on Blaxel— into automated workflows using [n8n](https://n8n.io/). Whether you’re new to Blaxel, n8n, or both, this tutorial will help you get started quickly with a minimalistic setup that you can build on.
## What You’ll Build
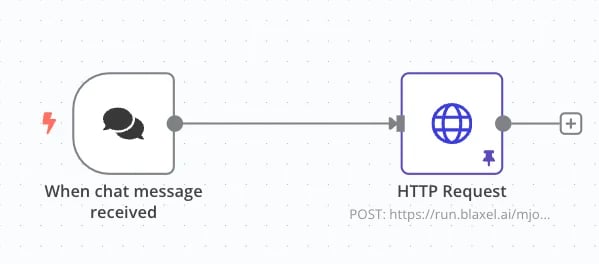 This is a simple n8n workflow that:
1. listens for chat messages,
2. then forwards those messages as inputs to your [AI agent on Blaxel](../Agents/Overview) via an HTTP request.
Here's a minimal JSON snippet that demonstrates the workflow:
```json theme={null}
{
"name": "Demo: My first AI Agent in n8n",
"nodes": [
{
"parameters": {
"options": {}
},
"id": "5b410409-5b0b-47bd-b413-5b9b1000a063",
"name": "When chat message received",
"type": "@n8n/n8n-nodes-langchain.chatTrigger",
"typeVersion": 1.1,
"position": [660, -200],
"webhookId": "a889d2ae-2159-402f-b326-5f61e90f602e"
},
{
"parameters": {
"method": "POST",
"url": "https://run.blaxel.ai/{YOUR-WORKSPACE}/agents/{YOUR-AGENT}",
"authentication": "genericCredentialType",
"genericAuthType": "httpHeaderAuth",
"sendBody": true,
"bodyParameters": {
"parameters": [
{
"name": "inputs",
"value": "={{ $json.chatInput }}"
}
]
},
"options": {}
},
"type": "n8n-nodes-base.httpRequest",
"typeVersion": 4.2,
"position": [1040, -200],
"id": "d389abf6-09cd-4fad-88fa-4a8c098bddf5",
"name": "HTTP Request",
"credentials": {
"httpHeaderAuth": {
"id": "{YOUR_AUTH_ACCOUNT_ID}",
"name": "Header Auth account"
}
}
}
],
"pinData": {},
"connections": {
"When chat message received": {
"main": [
[
{
"node": "HTTP Request",
"type": "main",
"index": 0
}
]
]
},
"HTTP Request": {
"main": [
[]
]
}
},
"active": false,
"settings": {
"executionOrder": "v1"
},
"versionId": "f82cb549-fa06-4cbe-9268-76451dd8e7fc",
"meta": {
"templateId": "PT1i+zU92Ii5O2XCObkhfHJR5h9rNJTpiCIkYJk9jHU=",
"templateCredsSetupCompleted": true,
"instanceId": "b90a39a88ba2a73793446bbe14503ff3b070f8a0ec6fce01ee5b4761919441e1"
},
"id": "Xu7ugYZKH0Dzn9hQ",
"tags": []
}
```
## Step 1: Update the URL Field
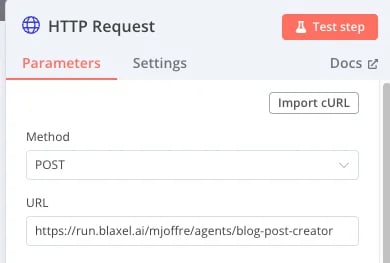
Before running your workflow, **update the URL field** in the HTTP Request node to match your [agent’s URL](../Agents/Query-agents). Replace `https://run.blaxel.ai/{YOUR-WORKSPACE}/agents/{YOUR-AGENT}` with your actual workspace and agent identifiers.
This is a simple n8n workflow that:
1. listens for chat messages,
2. then forwards those messages as inputs to your [AI agent on Blaxel](../Agents/Overview) via an HTTP request.
Here's a minimal JSON snippet that demonstrates the workflow:
```json theme={null}
{
"name": "Demo: My first AI Agent in n8n",
"nodes": [
{
"parameters": {
"options": {}
},
"id": "5b410409-5b0b-47bd-b413-5b9b1000a063",
"name": "When chat message received",
"type": "@n8n/n8n-nodes-langchain.chatTrigger",
"typeVersion": 1.1,
"position": [660, -200],
"webhookId": "a889d2ae-2159-402f-b326-5f61e90f602e"
},
{
"parameters": {
"method": "POST",
"url": "https://run.blaxel.ai/{YOUR-WORKSPACE}/agents/{YOUR-AGENT}",
"authentication": "genericCredentialType",
"genericAuthType": "httpHeaderAuth",
"sendBody": true,
"bodyParameters": {
"parameters": [
{
"name": "inputs",
"value": "={{ $json.chatInput }}"
}
]
},
"options": {}
},
"type": "n8n-nodes-base.httpRequest",
"typeVersion": 4.2,
"position": [1040, -200],
"id": "d389abf6-09cd-4fad-88fa-4a8c098bddf5",
"name": "HTTP Request",
"credentials": {
"httpHeaderAuth": {
"id": "{YOUR_AUTH_ACCOUNT_ID}",
"name": "Header Auth account"
}
}
}
],
"pinData": {},
"connections": {
"When chat message received": {
"main": [
[
{
"node": "HTTP Request",
"type": "main",
"index": 0
}
]
]
},
"HTTP Request": {
"main": [
[]
]
}
},
"active": false,
"settings": {
"executionOrder": "v1"
},
"versionId": "f82cb549-fa06-4cbe-9268-76451dd8e7fc",
"meta": {
"templateId": "PT1i+zU92Ii5O2XCObkhfHJR5h9rNJTpiCIkYJk9jHU=",
"templateCredsSetupCompleted": true,
"instanceId": "b90a39a88ba2a73793446bbe14503ff3b070f8a0ec6fce01ee5b4761919441e1"
},
"id": "Xu7ugYZKH0Dzn9hQ",
"tags": []
}
```
## Step 1: Update the URL Field
Before running your workflow, **update the URL field** in the HTTP Request node to match your [agent’s URL](../Agents/Query-agents). Replace `https://run.blaxel.ai/{YOUR-WORKSPACE}/agents/{YOUR-AGENT}` with your actual workspace and agent identifiers.
 ## Step 2: Configure Header Authentication
To secure your API calls, you must set up header authentication. Follow these two key steps:
1. **Set up the header auth credentials:**
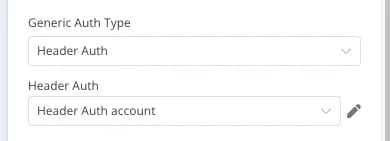
Ensure that your HTTP Request node is set in ***Header Auth*** type.
## Step 2: Configure Header Authentication
To secure your API calls, you must set up header authentication. Follow these two key steps:
1. **Set up the header auth credentials:**
Ensure that your HTTP Request node is set in ***Header Auth*** type.
 2. **Create Credentials:**
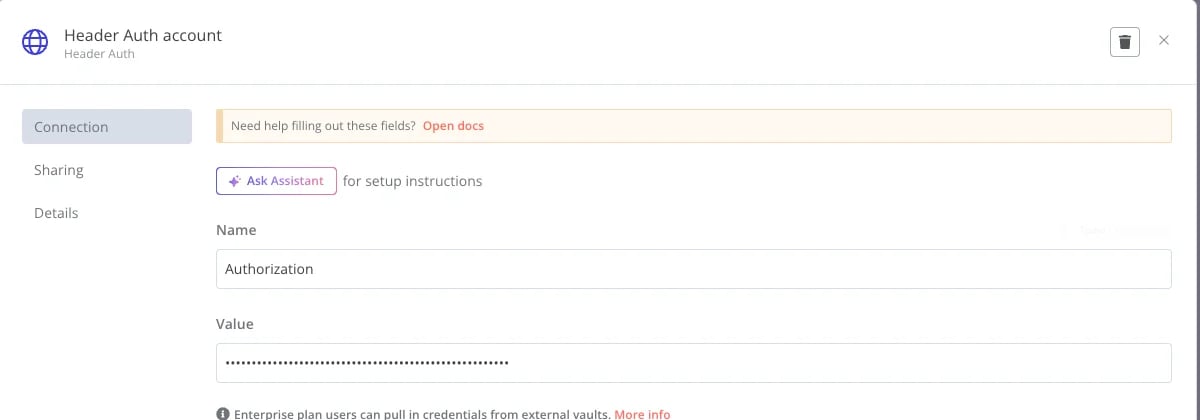
Fill out the form with the following details. For more details on obtaining your Blaxel API key, refer to this [Access Tokens documentation](../Security/Access-tokens#api-keys).
* **Name:** `Authorization`
* **Value:** `Bearer `
2. **Create Credentials:**
Fill out the form with the following details. For more details on obtaining your Blaxel API key, refer to this [Access Tokens documentation](../Security/Access-tokens#api-keys).
* **Name:** `Authorization`
* **Value:** `Bearer `
 Your n8n workflow is ready to launch!
Hooking up your Blaxel AI agents with n8n is like giving your dev toolkit superpowers! This bare-bones setup we just walked through is just scratching the surface. Think of it as your "Hello World" moment before diving into the really cool stuff - like building a workflow of multiple AI agents that work together.
Your n8n workflow is ready to launch!
Hooking up your Blaxel AI agents with n8n is like giving your dev toolkit superpowers! This bare-bones setup we just walked through is just scratching the surface. Think of it as your "Hello World" moment before diving into the really cool stuff - like building a workflow of multiple AI agents that work together.