{
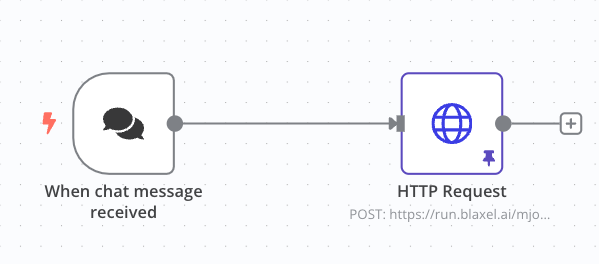
"name": "Demo: My first AI Agent in n8n",
"nodes": [
{
"parameters": {
"options": {}
},
"id": "5b410409-5b0b-47bd-b413-5b9b1000a063",
"name": "When chat message received",
"type": "@n8n/n8n-nodes-langchain.chatTrigger",
"typeVersion": 1.1,
"position": [660, -200],
"webhookId": "a889d2ae-2159-402f-b326-5f61e90f602e"
},
{
"parameters": {
"method": "POST",
"url": "https://run.blaxel.ai/{YOUR-WORKSPACE}/agents/{YOUR-AGENT}",
"authentication": "genericCredentialType",
"genericAuthType": "httpHeaderAuth",
"sendBody": true,
"bodyParameters": {
"parameters": [
{
"name": "inputs",
"value": "={{ $json.chatInput }}"
}
]
},
"options": {}
},
"type": "n8n-nodes-base.httpRequest",
"typeVersion": 4.2,
"position": [1040, -200],
"id": "d389abf6-09cd-4fad-88fa-4a8c098bddf5",
"name": "HTTP Request",
"credentials": {
"httpHeaderAuth": {
"id": "{YOUR_AUTH_ACCOUNT_ID}",
"name": "Header Auth account"
}
}
}
],
"pinData": {},
"connections": {
"When chat message received": {
"main": [
[
{
"node": "HTTP Request",
"type": "main",
"index": 0
}
]
]
},
"HTTP Request": {
"main": [
[]
]
}
},
"active": false,
"settings": {
"executionOrder": "v1"
},
"versionId": "f82cb549-fa06-4cbe-9268-76451dd8e7fc",
"meta": {
"templateId": "PT1i+zU92Ii5O2XCObkhfHJR5h9rNJTpiCIkYJk9jHU=",
"templateCredsSetupCompleted": true,
"instanceId": "b90a39a88ba2a73793446bbe14503ff3b070f8a0ec6fce01ee5b4761919441e1"
},
"id": "Xu7ugYZKH0Dzn9hQ",
"tags": []
}