Deploy an MCP server with Blaxel CLI
This section assumes you have developed the MCP server locally, as explained in this documentation, and are ready to deploy it.Serve locally
Blaxel offers you a way to serve locally either:The server and MCP Inspector to test it (recommended)
The server and MCP Inspector to test it (recommended)
You can test it by running the following command which launches both the MCP server and a web application to query it (MCP Inspector, managed by MCP) locally.The web application is accessible at: http://127.0.0.1:6274. Alternatively, you can just simply serve the server locally by running
bl serve --hotreload.Just the server
Just the server
You can serve the MCP server locally in order to make the entrypoint function (by default: You can then create an MCP Client to communicate with your server. When testing locally, communication happens over stdio, but when deployed on Blaxel, your server will use streamable HTTP instead.Add the flag
server.ts / server.py) available on a local endpoint.Run the following command to serve the MCP server:--hotreload to get live changes.Deploy on production
You can deploy the MCP server in order to make the entrypoint function (by default:server.ts / server.py) available on a global hosted endpoint. When deploying to Blaxel, you get a dedicated endpoint that enforces your deployment policies.
Run the following command to build and deploy the MCP server on Blaxel:
bl push to build and push the MCP container image to the Blaxel registry. bl push only publishes the image; it does not create a new sandbox deployment, update existing deployments, or restart running processes. This is useful for preparing images in advance.
You can now connect to the MCP server either from an agent on Blaxel (using the Blaxel SDK), or from an external client that supports HTTP.
Example of tool calling via Blaxel SDK
Example of tool calling via Blaxel SDK
Connect to an MCP server
Learn how to run tool calls through your MCP server.
Customize an MCP server deployment
You can set custom parameters for an MCP server deployment (e.g. specify the server name, etc.) in theblaxel.toml file at the root of your directory.
For more information on MCP deployment settings, refer to the reference section down at the bottom of this guide.
Deploy with a Dockerfile
While Blaxel uses predefined, optimized container images to build and deploy your code, you can also deploy your workload using your own Dockerfile.Deploy using Dockerfile
Deploy resources using a custom Dockerfile.
Deploy multiple resources at once
Using a custom Dockerfile allows for deploying multiple agents & MCPs from the same repository with shared dependencies.Deploy multiple resources with shared files
Deploy multiple agents & MCP servers with shared context from a single repository.
Reference for deployment life-cycle
Maximum runtime
- Deployed MCP servers have a maximum runtime of 15 minutes.
Manage revisions
As you iterate on your software development, you will need to update the version of a function that is currently deployed and used by your consumers. Every time you build a new version of your function, this creates a revision. Blaxel stores the last 5 revisions for each object.
- rollback a deployment to its exact state from an earlier date
- create a revision without immediate deployment to prepare for a future release
- implement progressive rollout strategies, such as canary deployments
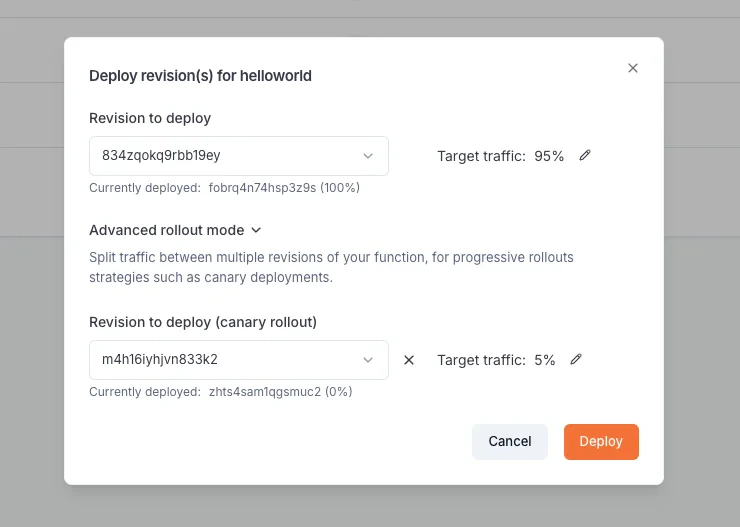
When making a deployment using Blaxel CLI (
bl deploy), the new traffic routing depends on the --traffic option. Without this option specified, Blaxel will automatically deploy the new revision with full traffic (100%) if the previous deployment was the latest revision. Otherwise, it will create the revision without deploying it (0% traffic).Code mode
Blaxel supports “code mode” natively, enabling a more efficient way to execute tool calls over MCP.Deployment reference
The MCP server deployment can be configured via the blaxel.toml file in your MCP server directory. This file is not mandatory; if the file is not found or a required option is not set, you will be prompted for the information during deployment.name,workspace, andtypefields are optional and serve as default values. Any bl command run in the folder will use these defaults rather than prompting you for input.[env]section defines environment variables that the MCP server can access via the SDK. Note that these are NOT secrets.[[triggers]]and[triggers.configuration]sections define ways to send requests to the MCP servers. You can also make them either private (default) or public (authenticationType = "public").
Define entrypoints in Python
Define entrypoints in Python
Additionally, when developing in Python, you can define an This
[entrypoint] section to specify how Blaxel is going to start your server.prod: this is the command that will be used to serve your MCP server
dev: same as prod in dev mode, it will be used with the command--hotreload. Example:
entrypoint section is optional. If not specified, Blaxel will automatically detect in the MCP server’s content and configure your server’s startup settings.Define entrypoints in TypeScript
Define entrypoints in TypeScript
In TypeScript, entrypoints are managed in the
scripts in the package.json file at the root of the directory.scripts.start: start the server locally through the TypeScript command, to avoid having to build the project when developing.scripts.build: build the project. It is done automatically when deploying.scripts.prod: start the server remotely on Blaxel from the dist folder, the project needs to have been built before.scripts.dev: same as start, but with hotreload. It’s useful when developing locally, each file change is reflected immediately.
Deployment manifests (advanced usage)
Whenbl deploy runs, it generates a YAML configuration manifest automatically and deploys it to Blaxel’s hosting infrastructure. You can also create custom manifest files in the .blaxel folder and deploy them using the following command:
Query MCP servers
Learn how to run tool calls on your MCP server.
Use Claude Agent SDK with MCP code mode on Blaxel
Build an agent that connects to a Blaxel MCP server running in code mode using Claude Agent SDK.