Sandbox lifecycle
Unlike traditional sandbox infrastructure, Blaxel’s standout feature is fully managed lifecycle. Sandboxes resume from standby in under 25 milliseconds and automatically scale to zero after a few seconds of inactivity. This means that your sandboxes wait on standby indefinitely when not used, eliminating cold starts without complex orchestration. Memory state is maintained even after scaling down, including the running processes and entire filesystem. For cost-effective long-term persistence, you can attach volumes to sandboxes. For shared filesystems mountable across multiple sandboxes, see Agent Drive.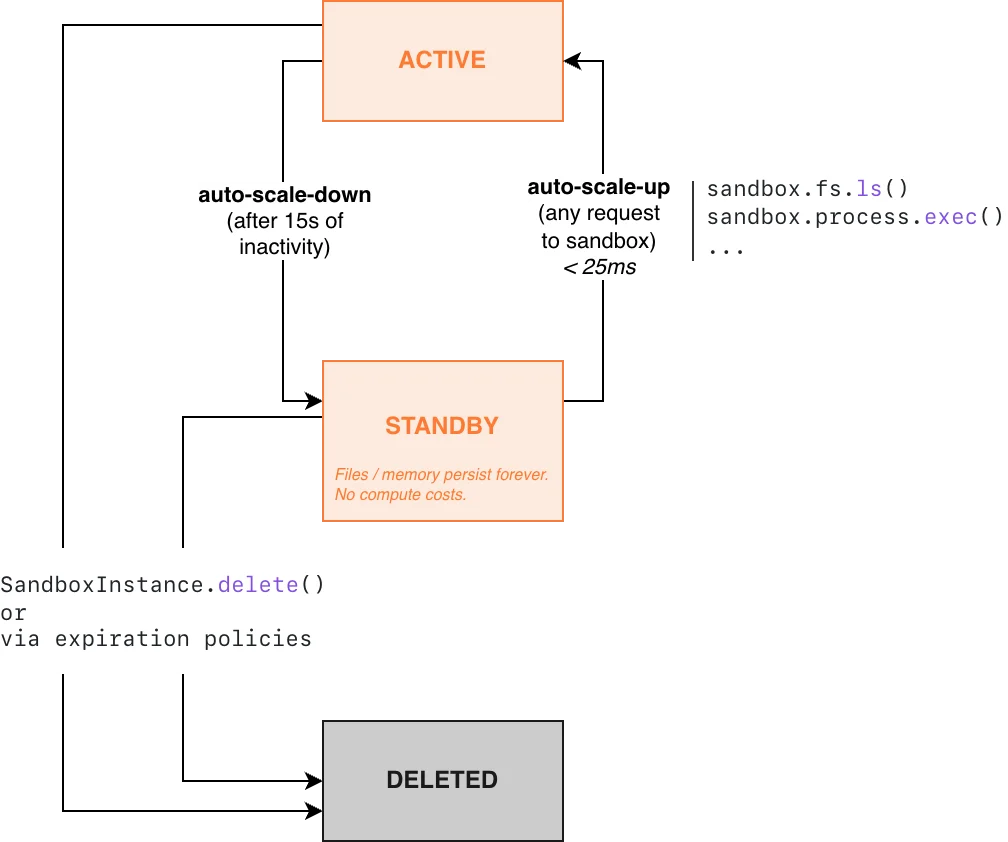
Active mode
Sandboxes stay in active mode as long as there’s an active connection to them. You are charged for memory (based on how much you allocated at sandbox creation) and storage while a sandbox is in active mode. CPU resources are allocated accordingly by Blaxel based on your selected memory allocation and are not charged separately. For example, a sandbox with 8 GB memory is allocated 4 CPU cores, while one with 16 GB memory is allocated 6 CPU cores. Learn more about pricing.Standby mode
If a sandbox does not have an active connection, it automatically transitions to a warm standby mode (also called scale-to-zero). This transition happens in approximately 15 seconds. If a sandbox has an ongoing WebSocket/TCP connection, there is a 15-minute idle timeout for such a connection. This means that if the WebSocket/TCP connection remains idle for 15 minutes with no activity, the sandbox will automatically transition to standby mode. When transitioning to standby mode, Blaxel automatically creates a snapshot of the entire state (including the complete file system in memory, preserving both files and running processes) and transitions the sandbox to standby mode within approximately 15 seconds. Reconnecting to the sandbox transitions it back to active mode. Any running processes are included in this snapshot and will be instantly restored when you reconnect to the sandbox. You are not charged for memory while a sandbox is in standby mode. However, you are charged for the storage of the snapshot and/or the volumes. Learn more about pricing.To prevent a sandbox from going into standby, you can use process keep-alive, WebSocket ping/pong messages or other techniques to prevent the timeout.
Deletion
In addition to automatic scale-to-zero, Blaxel also supports automatic sandbox deletion based on expiration policies. Starter quotas enforce time-to-live (TTLs), while higher quota tiers unlock sandboxes with unlimited persistence.Automatic deletion differs from automatic standby (scale-to-zero). Deleted sandboxes cannot be recovered, while sandboxes in standby mode can be resumed instantly.
Sandbox deployment statuses
During the deployment process, the possible sandbox statuses are:UPLOADING: A new sandbox version has just been uploaded; the build has not started yet.BUILDING: A new sandbox version has been uploaded and the build is in progress.DEPLOYING: The sandbox deployment is in progress.DEPLOYED: The sandbox is ready to use. It is either in active mode or standby mode.FAILED: An error occurred during the build or deployment of the sandbox.TERMINATED: A TTL was set for the sandbox; it has been deleted and will be removed from the API/UI soon.DELETING: A deletion request has been triggered and the deletion is in progress.
UPLOADING/BUILDING statuses only appear when using bl deploy and bl push from a sandbox image folder.Use cases
Some examples of use cases include:- Code review agents that analyze repositories to detect the effects of changes. These agents run fully isolated compute environments for each tenant while keeping them snapshotted in standby between sessions, eliminating the need to clone the repo every time.
- Code generation agents that iterate in their own compute environments, and instantly render live application previews as human users build, step away, and log back in.
- Data analyst agents that execute ad hoc data analysis workflows, generating scripts on-the-fly and running them securely against private files or data within an isolated, ZDR-compliant environment.
- Background agents that operate beyond their pre-configured tools. Each agent gets its own “personal computer” where it can autonomously install packages, execute custom scripts, store files, and adapt to new requirements securely. They can parallelize dozens of those personal computers.
Create a sandbox
Using the SDKs
Create a new sandbox using the Blaxel SDK by specifying a name, image to use, deployment region, optional labels, and the ports to expose. Note that ports 80 (system), and 443 & 8080 (sandbox API) are reserved by Blaxel.Learn more about authentication on Blaxel
Learn more about authentication on Blaxel
The Blaxel SDK requires two environment variables to authenticate:The Blaxel SDK does not accept credentials as constructor arguments. Credentials must come from environment variables, a
You can create an API key from the Blaxel console. Your workspace name is visible in the URL when you log in to the console (e.g.
app.blaxel.ai/{workspace}).Set them as environment variables or add them to a .env file at the root of your project:.env file, or a local CLI login session (see below).When developing locally, you can also log in to your workspace with Blaxel CLI (as shown above). This allows you to run Blaxel SDK functions that will automatically connect to your workspace without additional setup. When you deploy on Blaxel, authentication is handled automatically — no environment variables needed.createIfNotExists() / create_if_not_exists(). Blaxel first checks for an existing sandbox with the provided name and either retrieves it or creates a new one using your specified configuration.
create(), which raises an error when a sandbox with the specified name already exists:
Using the CLI and Console
It is also possible to create a sandbox via the Blaxel CLI or the Blaxel Console.- CLI
- Console
my-sandbox and then deploys the sandbox on Blaxel.The project directory contains the Blaxel configuration file blaxel.toml, which can be further customized to suit your sandbox deployment requirements, by modifying the base image, memory, environment, etc. Learn more about the blaxel.toml file.Using the API
Although less common, it is also possible to create a sandbox by directly interacting with the Blaxel REST API.Understand sandbox configuration
Images
Blaxel provides pre-built sandbox images for common needs (e.g.blaxel/nextjs:latest, blaxel/py-app:latest).
It is also possible to build your own custom images to create sandboxes with a consistent, customized set of tools, configurations, or entrypoint scripts.
Memory and filesystem
For maximum performance, Blaxel sandboxes store part of their filesystem in memory. The base of the filesystem (the user-supplied image) is stored as read-only files on host storage using a highly-efficient format called EROFS (Extendable Read-Only File System). On top of the read-only base, a writable layer lives entirely in the sandbox’s RAM usingtmpfs. OverlayFS serves as orchestrator, directing reads to the EROFS base and writes to the in-memory tmpfs filesystem.
Due to this, Blaxel sandboxes reserve, when possible, approximately 50% of the available memory for the tmpfs filesystem. More information on our implementation is available in this blog post.
For write-heavy workloads, set storageMb (TypeScript/CLI) or storage_mb (Python) when creating the sandbox to provision disk-backed root storage without increasing memory. This storage is part of the sandbox root filesystem, is deleted with the sandbox, and is capped by your account’s ephemeral-volume quota.
storageMb cannot be combined with a persistent volume mounted at /. Use root storage for ephemeral root filesystem capacity, or use a volume at a subpath such as /data when data should persist independently from the sandbox lifecycle.
Use volumes when data needs to live at a specific mount path or persist independently from the sandbox lifecycle. Volumes require deleting and recreating the sandbox first, and are not as fast as the native in-memory filesystem.
Ports
The following ports are reserved by Blaxel’s system:- 443: This port hosts the main sandbox API and is exposed via HTTPS
- 80: Reserved for system operations
- 8080: Reserved for sandbox API functionality
ports parameter. This allows you to access these ports from outside the sandbox via the sandbox API.
You only need to expose ports at sandbox creation time if you plan to access the port via the sandbox API. For access via preview URL, ports are dynamically opened as needed.
Regions
Select the region where you want to deploy your sandbox. Theregion parameter is optional but recommended, and can reference any of the supported region codes.
It is also possible to set a default region using the BL_REGION environment variable (e.g. in your .env file) to avoid repeating it in every SDK call.
Labels
You can also add optional labels for sandboxes. Labels are specified as key-value pairs during sandbox creation.External ID
External IDs let you tag sandboxes with your own identifier so you can retrieve them later without scanning your entire workspace. Use them to index sandboxes by session ID, user ID, conversation ID, or any caller-owned key.Requires
@blaxel/core ≥ 0.2.93 (TypeScript) or blaxel ≥ 0.2.57 (Python).externalId:
- Max 64 characters, alphanumeric and dashes only (
a-z,A-Z,0-9,-) - Not unique: multiple sandboxes can share the same value
- Mutable: can be changed after creation
- Omitting it on update preserves the current value
externalId in metadata at creation time:
Kernel networking
By default, sandboxes run on a minimal kernel without iptables support. You can enable iptables by passingextraArgs at creation time.
extraArgs can only be set when creating a sandbox. It cannot be changed after creation.Expiration
Blaxel supports automatic sandbox deletion based on specific conditions.Retrieve an existing sandbox
To reconnect to an existing sandbox, simply provide its name:List sandboxes
To retrieve all sandboxes in your workspace, use the built-in SDK pagination helper functions.Pagination is recommended for list operations because retrieving all available resources in a single request is slow and resource-intensive, and therefore does not scale well.
Delete a sandbox
When you delete a sandbox, all data is immediately erased. If the sandbox was never in standby mode, Blaxel guarantees ZDR (zero data retention).
-
the class-level
delete()method with the sandboxnameas argument, or -
by calling the instance-level
delete()method:
Upgrade a sandbox’s API
Every Blaxel sandbox includes a custom API binary, which is necessary for sandbox functionality like process management and file operations. It is possible to perform an in-place upgrade of this API without needing to recreate or restart the sandbox.This feature is currently in beta and only available for sandboxes built or created with sandbox API v0.2.0 or later (sandboxes created after 2 Feb 2026). For sandboxes built or created earlier than this date/API version, in-place upgrade is not possible; the sandbox must be recreated to obtain the new API.
Connect to a sandbox with an interactive terminal
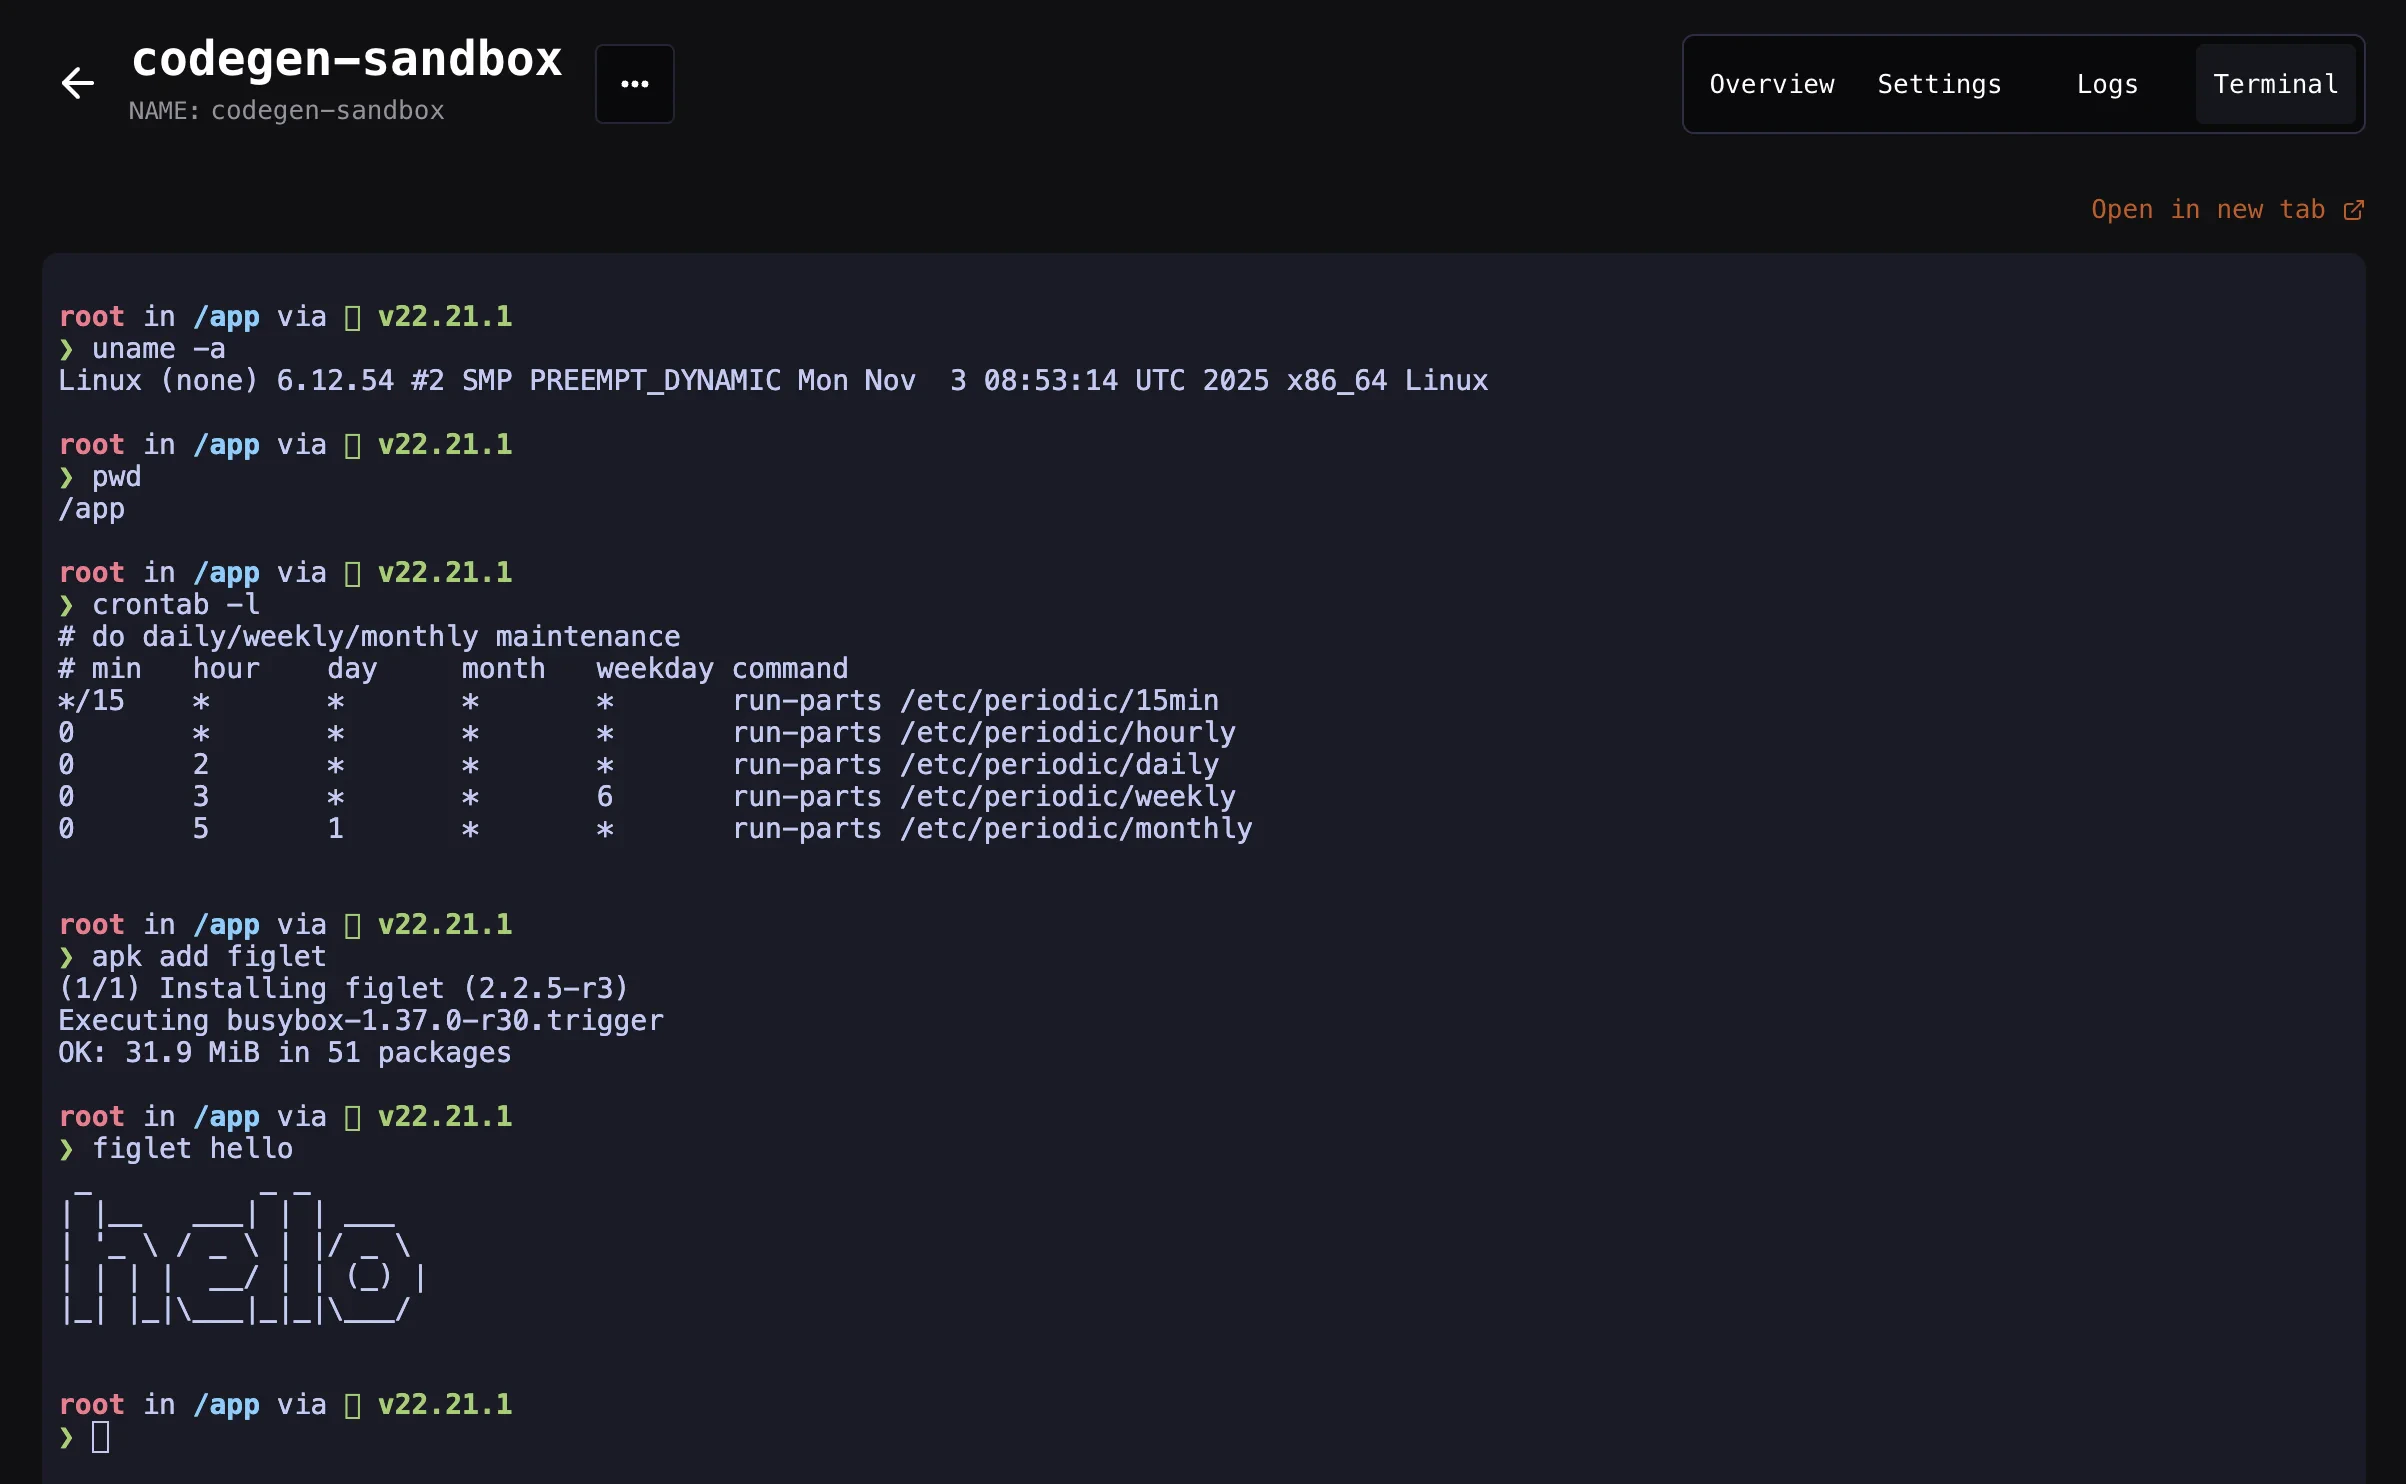
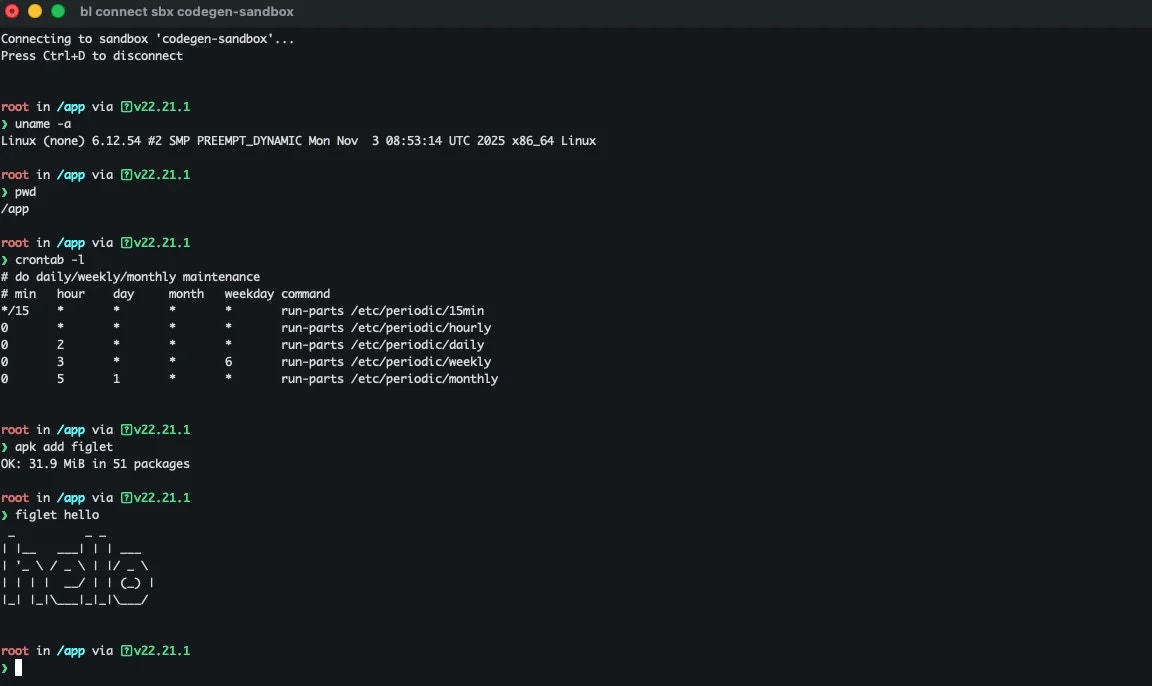
You can explore the contents of a sandbox with an interactive terminal. You can access this terminal in two ways:-
From the Blaxel Console, by visiting the detail page for your sandbox in your web browser and selecting the Terminal tab:
-
From your local host, by running:
Expiration policies
Automatically delete sandboxes based on specific conditions.
MCP server
Interact with a sandbox through its MCP server.
Variables and secrets
Set environment variables and secrets in sandboxes.
Processes and commands
Execute and manage processes in sandboxes.
File system operations
Manage directories and files in sandboxes.
Tools for AI codegen
Manage codebases with tools specifically designed for code generation.
Log streaming
Access logs generated in a sandbox.
Ports
Expose and connect to ports of a sandbox.
Preview in real-time
Render code in real-time via a direct preview URL.
Sessions
Manage temporary sessions to connect to sandboxes from a frontend client.
Proxy & network
Route outbound traffic through the proxy, configure firewalls, and bind egress IPs.
Volumes
Attach volumes to sandboxes to persist files.
Images
Create custom sandbox images.
Best practices
Recommended practices for using Blaxel sandboxes.
Example: Connect Claude Code to a Blaxel Sandbox
Connect a Claude Agent SDK agent to a Blaxel sandbox and operate it using its MCP server.
See more tutorials and examples
Read tutorials for running applications built with popular frameworks like Astro, Expo and Next.js on Blaxel.
Sandbox API
Access your sandbox with an HTTP REST API.